Trying to find useful things to do with emerging technologies in open education and data journalism. Snarky and sweary to anyone who emails to offer me content for the site.
So I think have the bare bones of a lOCL (local Open Computing Lab) thing’n’workflow running…
I’m also changing the name… to VOCL — Virtual Open Computing Lab … which is an example of a VCL, Virtual Computing Lab, that runs VCEs, Virtual Computing Environments. I think…
If you are Windows, Linux, Mac or a 32 bit Raspberry Pi, you should be able to do the following:
Next, we will install a universal browser based management tool, portainer:
install portainer:
on Mac/Linux/RPi, run: docker run -d -p 80:8000 -p 9000:9000 --name=portainer --restart=always -v /var/run/docker.sock:/var/run/docker.sock portainer/portainer-ce
on Windows, the start up screen suggests docker run -d -p 80:8000 -p 9000:9000 --name=portainer --restart=always -v \\.\pipe\docker_engine:\\.\pipe\docker_engine portainer/portainer-ce may be the way to go?
On my to do list is to customise portainer a bit and call it something lOCL.
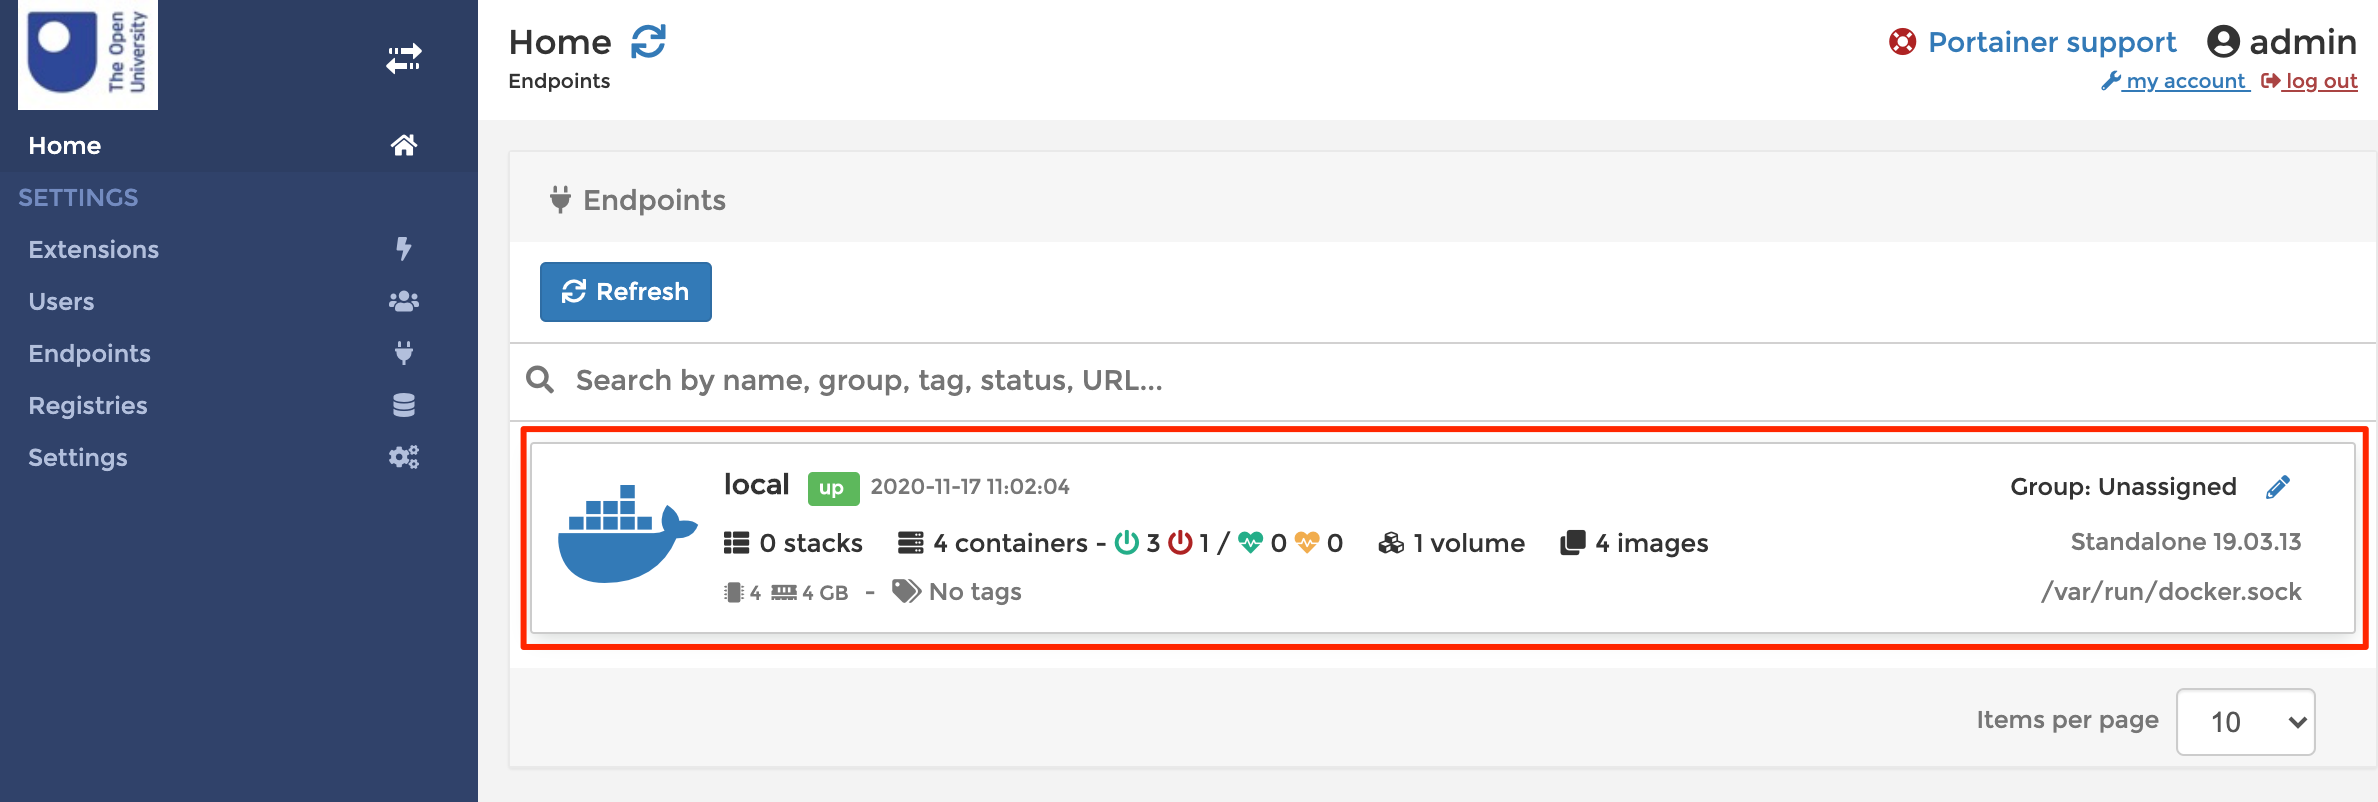
On first run, portainer will prompt you for an admin password (at least 8 characters).
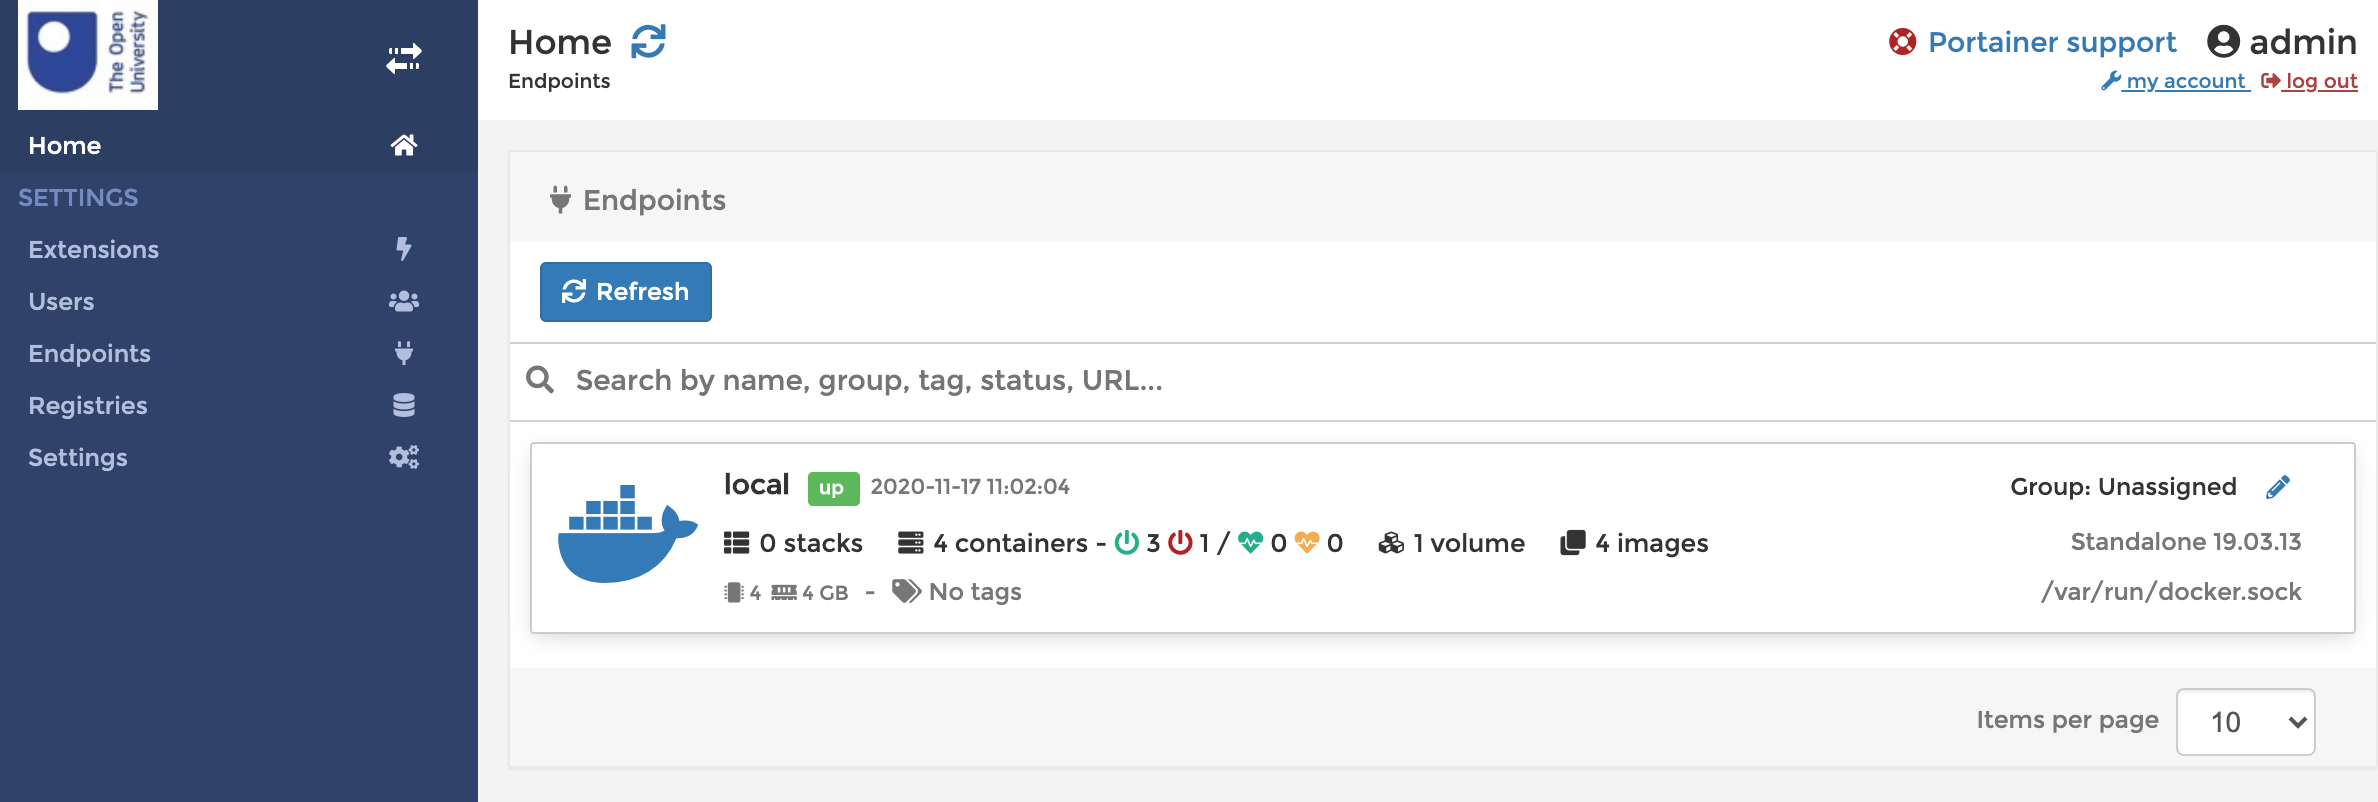
You’ll then have to connect to a Docker Engine. Let’s use the local one we’re actually running the application with…
When you’re connected, select to use that local Docker Engine:
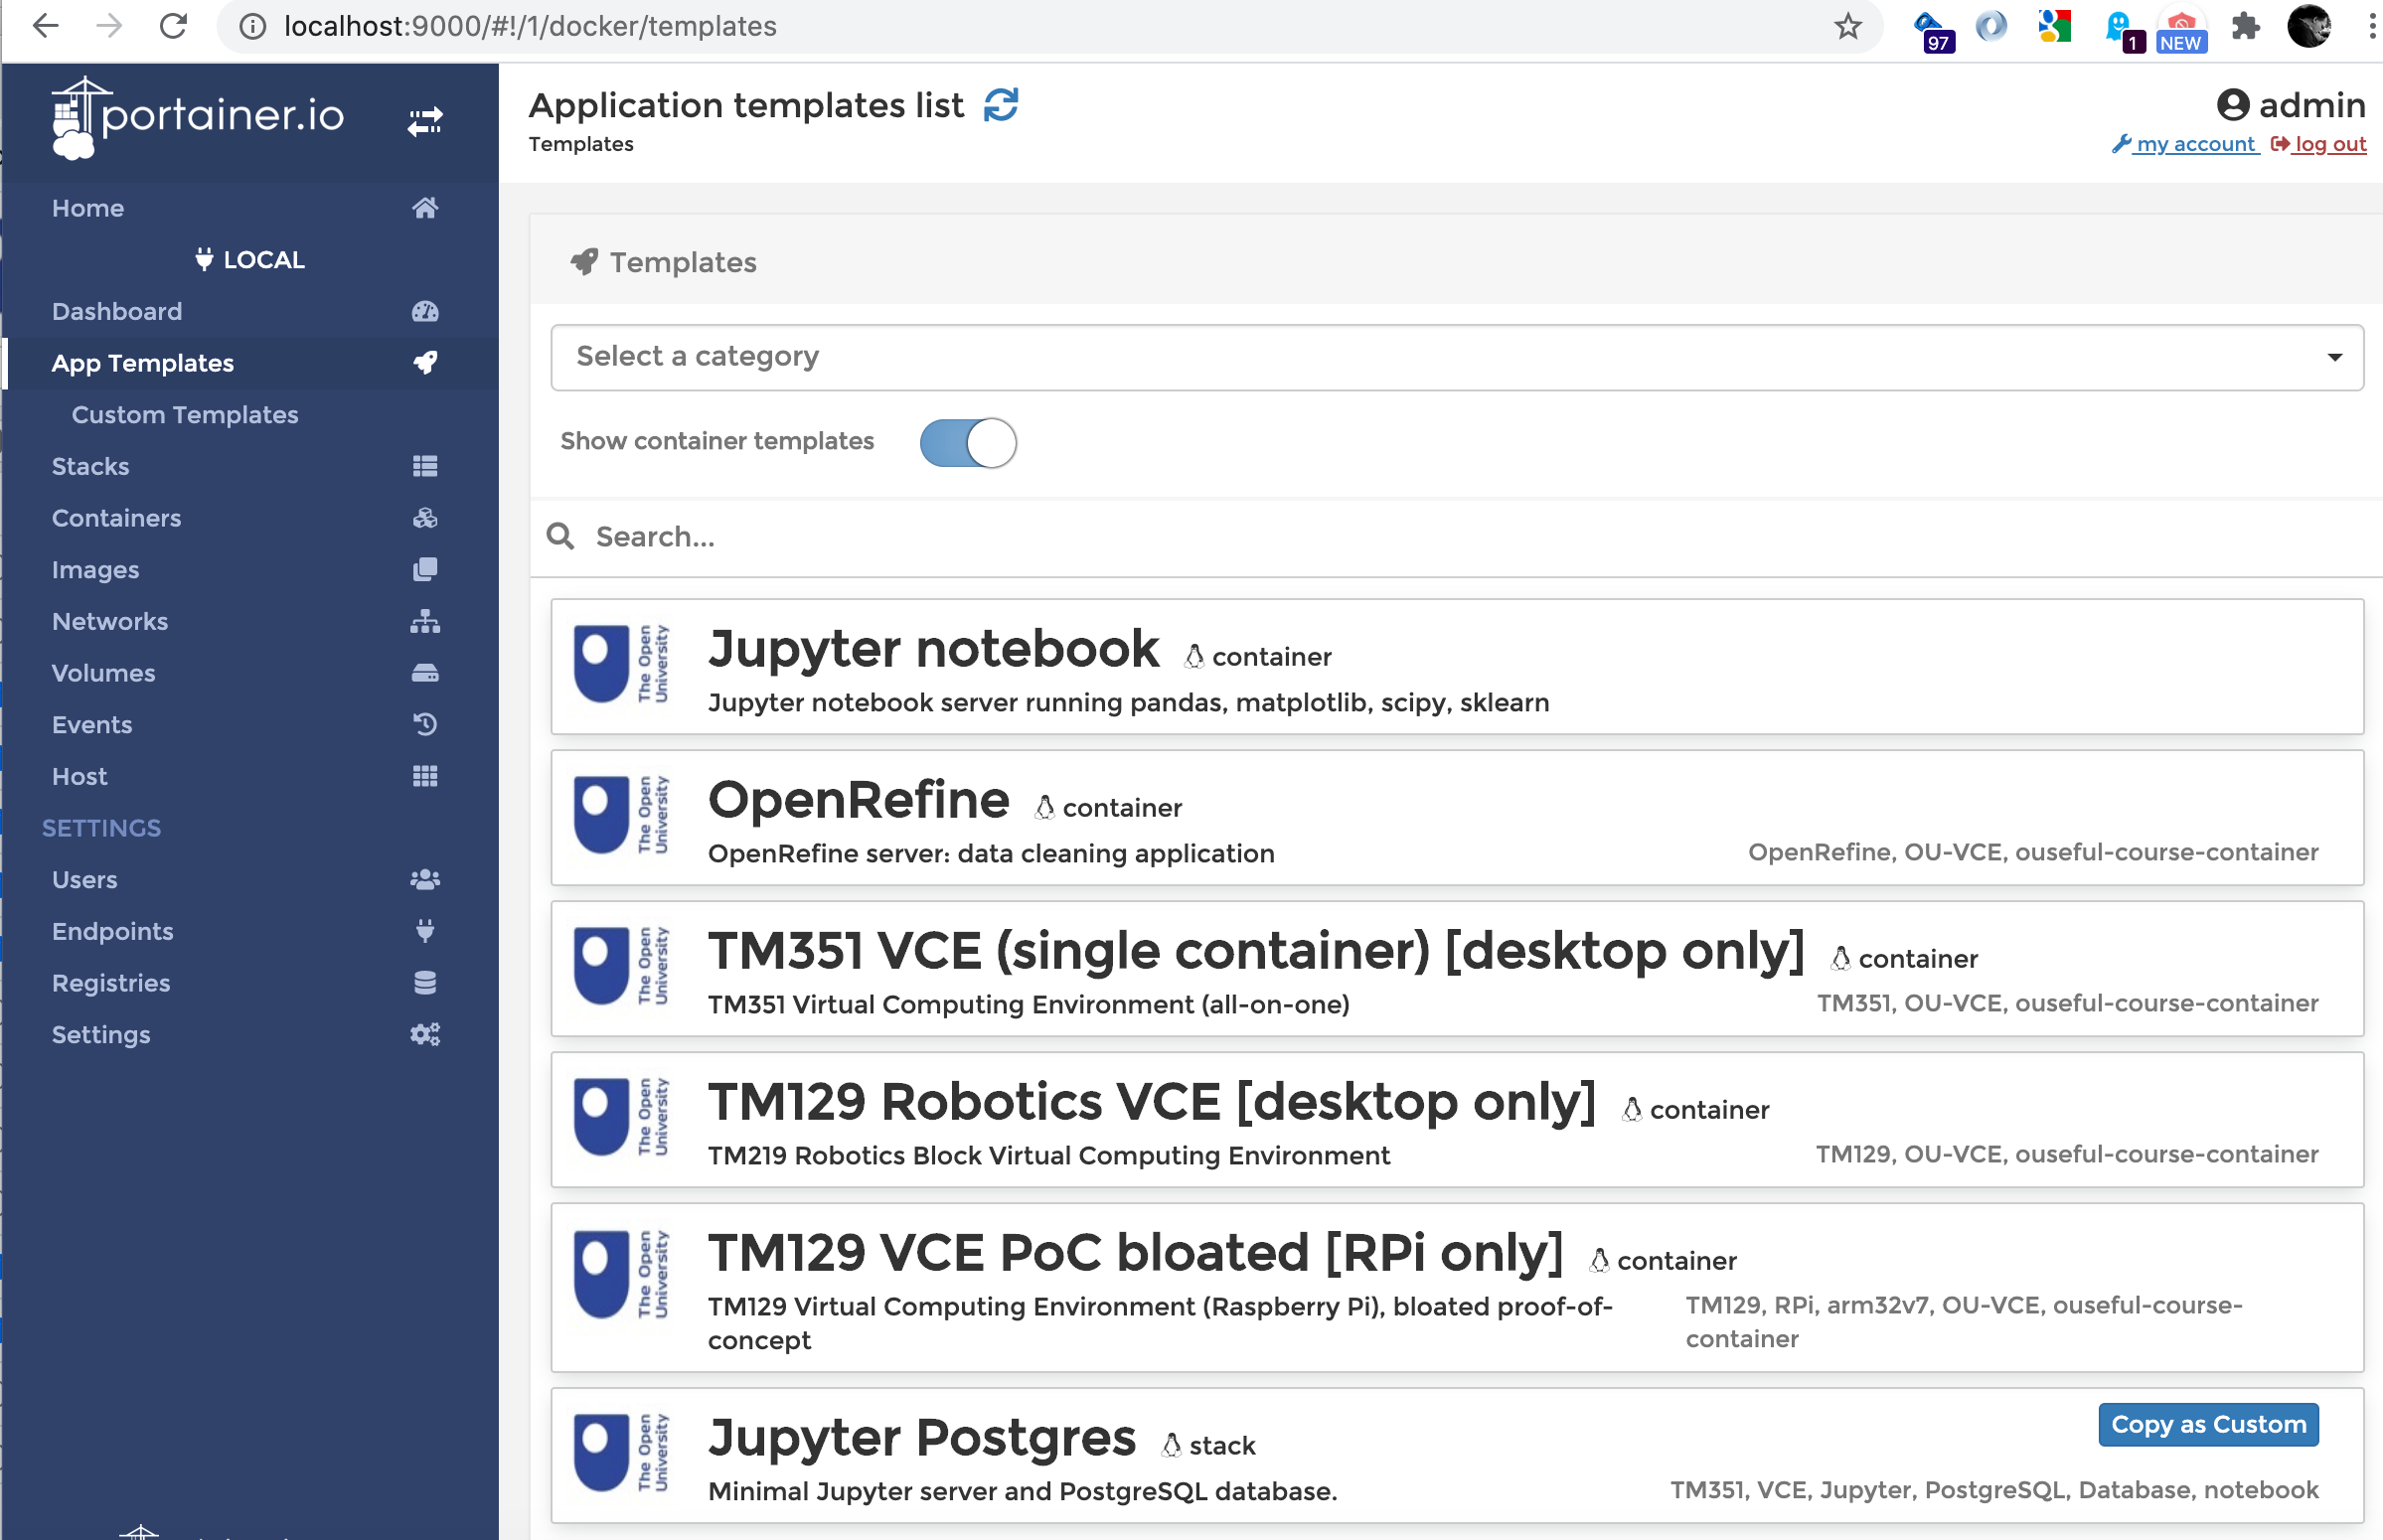
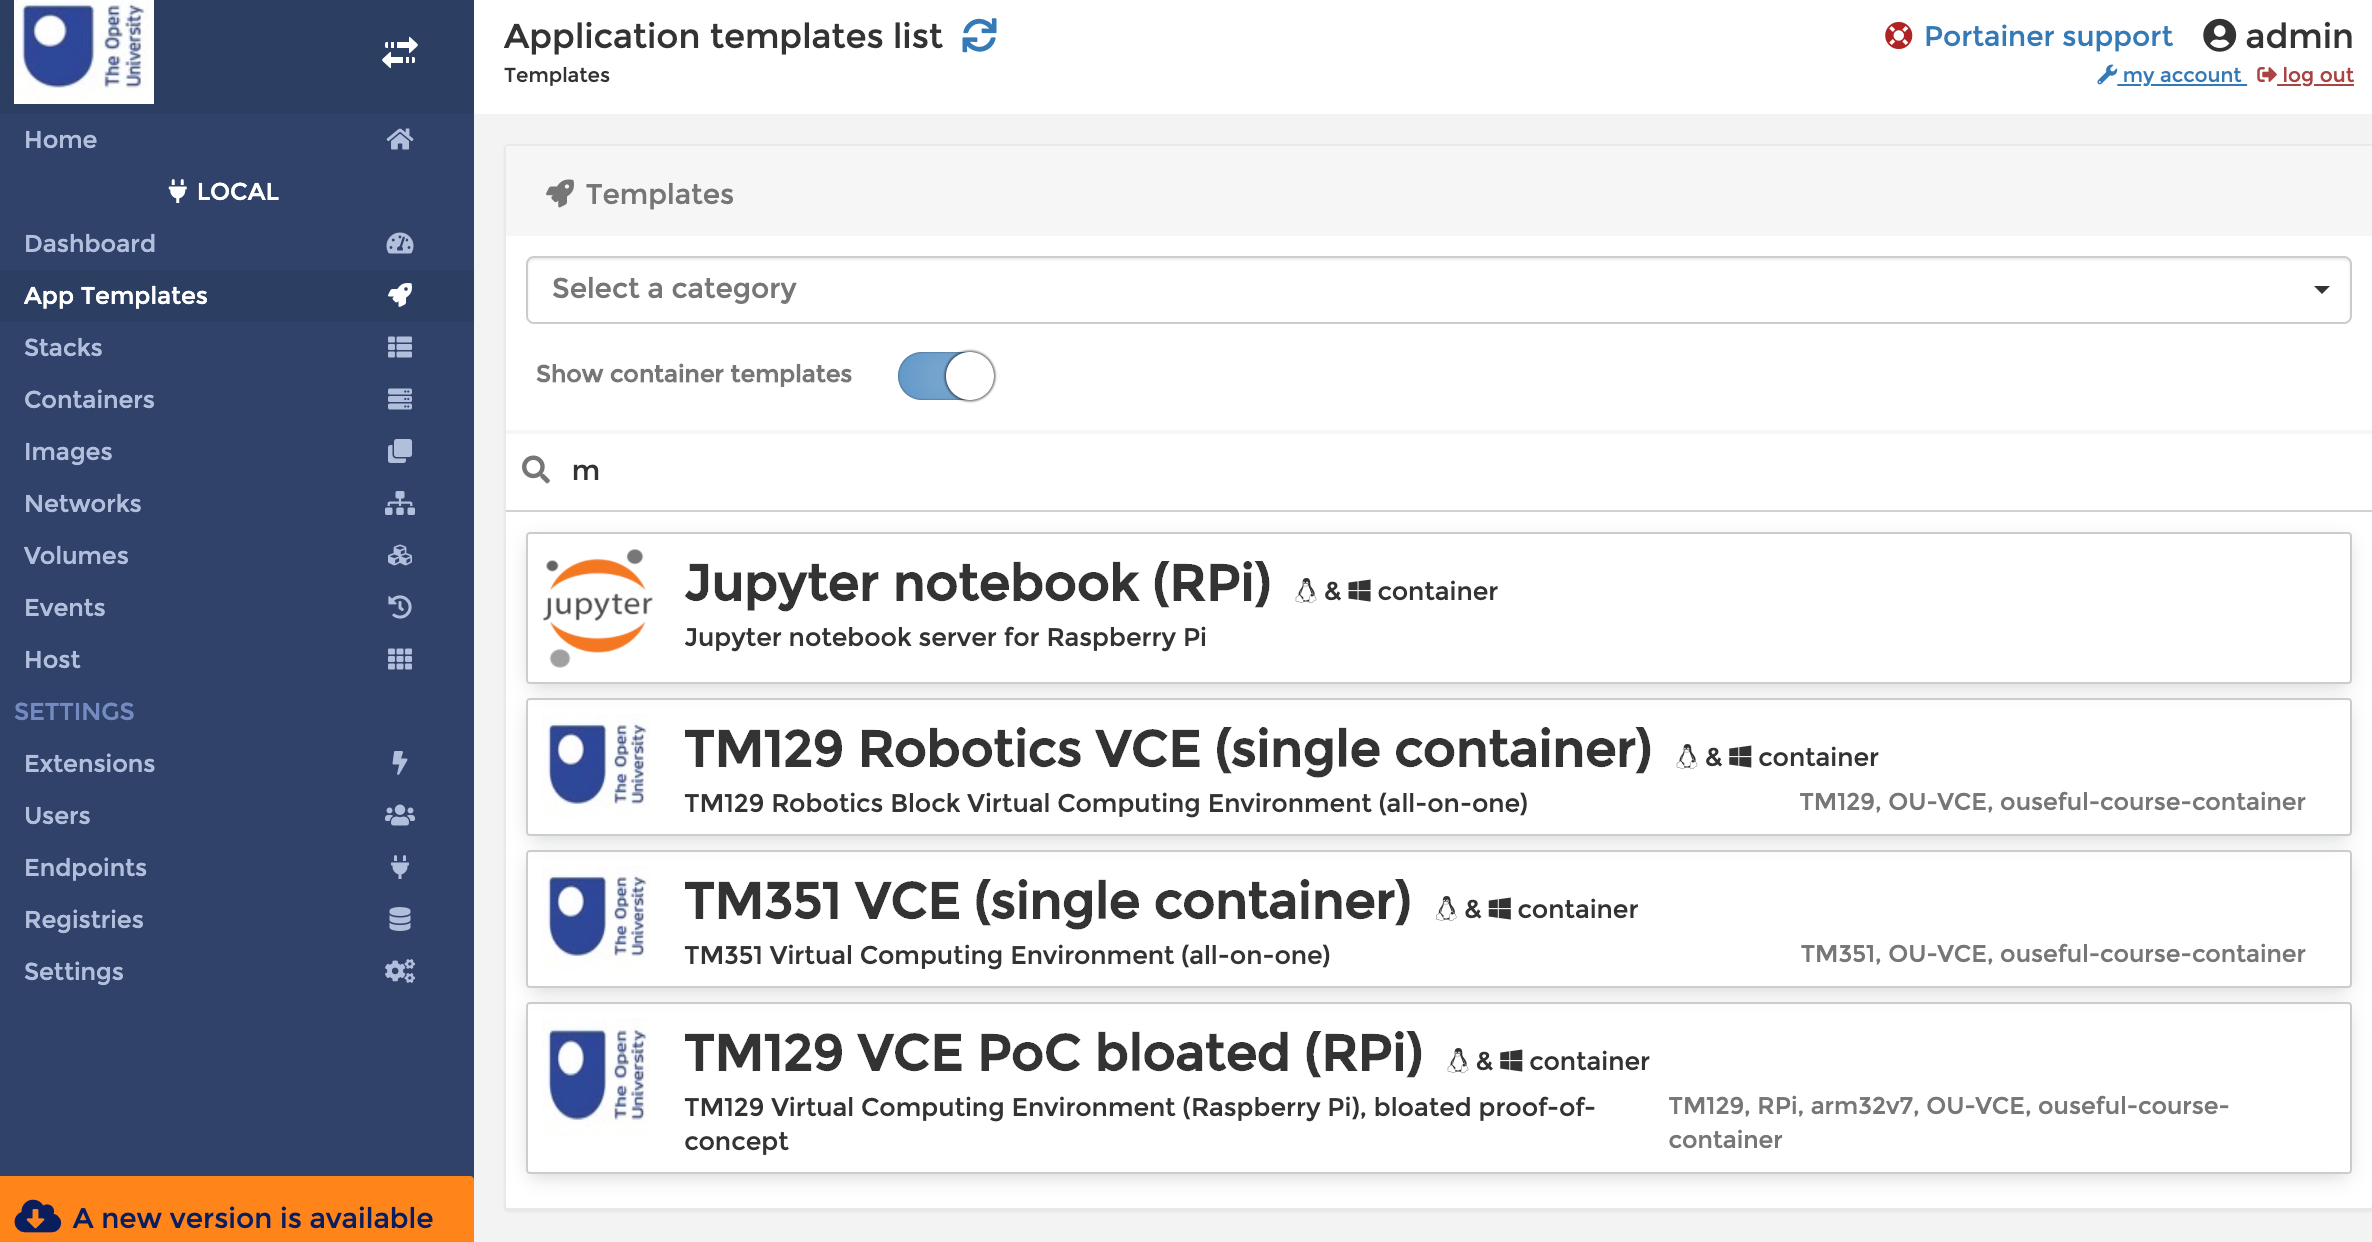
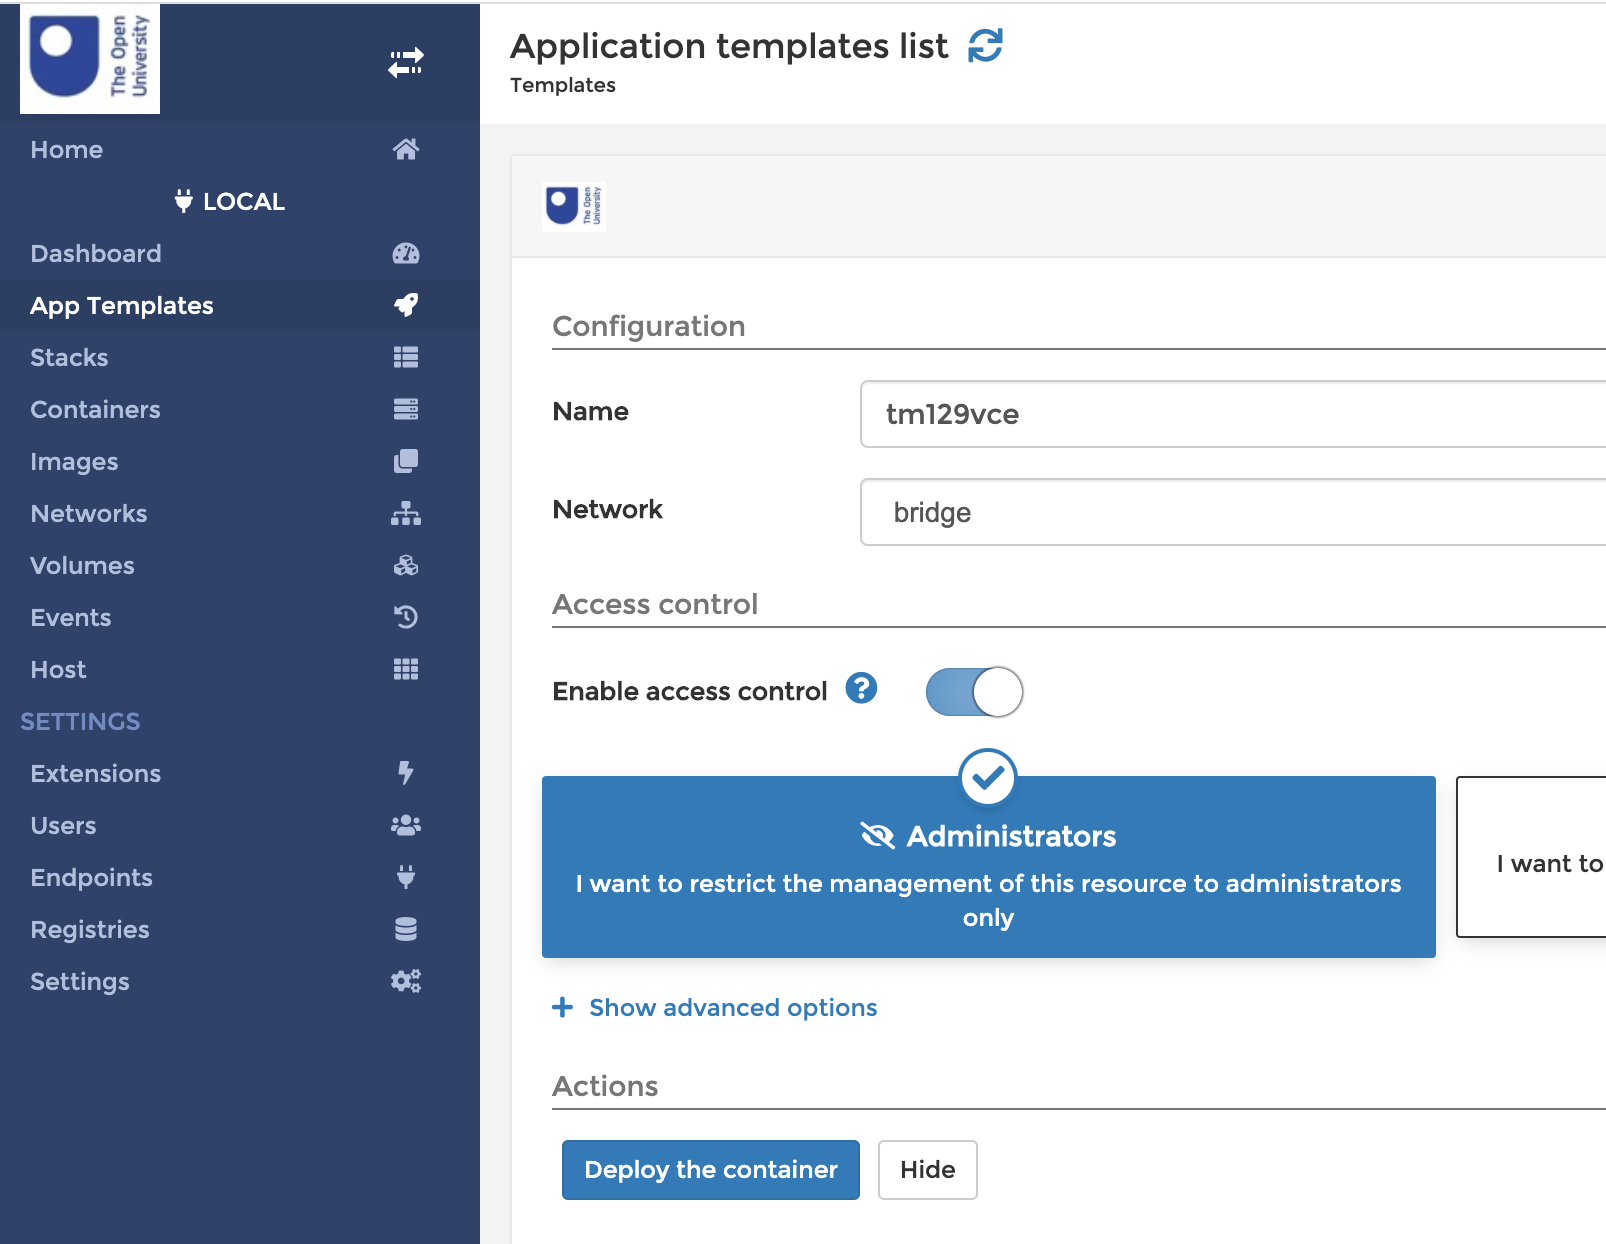
From the App Templates, you should now be able to see a feed of examaple containers:
The [desktop only] containers can only be run on desktop (amd64) processors, but the other should run on a desktop computer or on a Raspberry Pi using docker on a 32 bit Rasbperry Pi operating system.
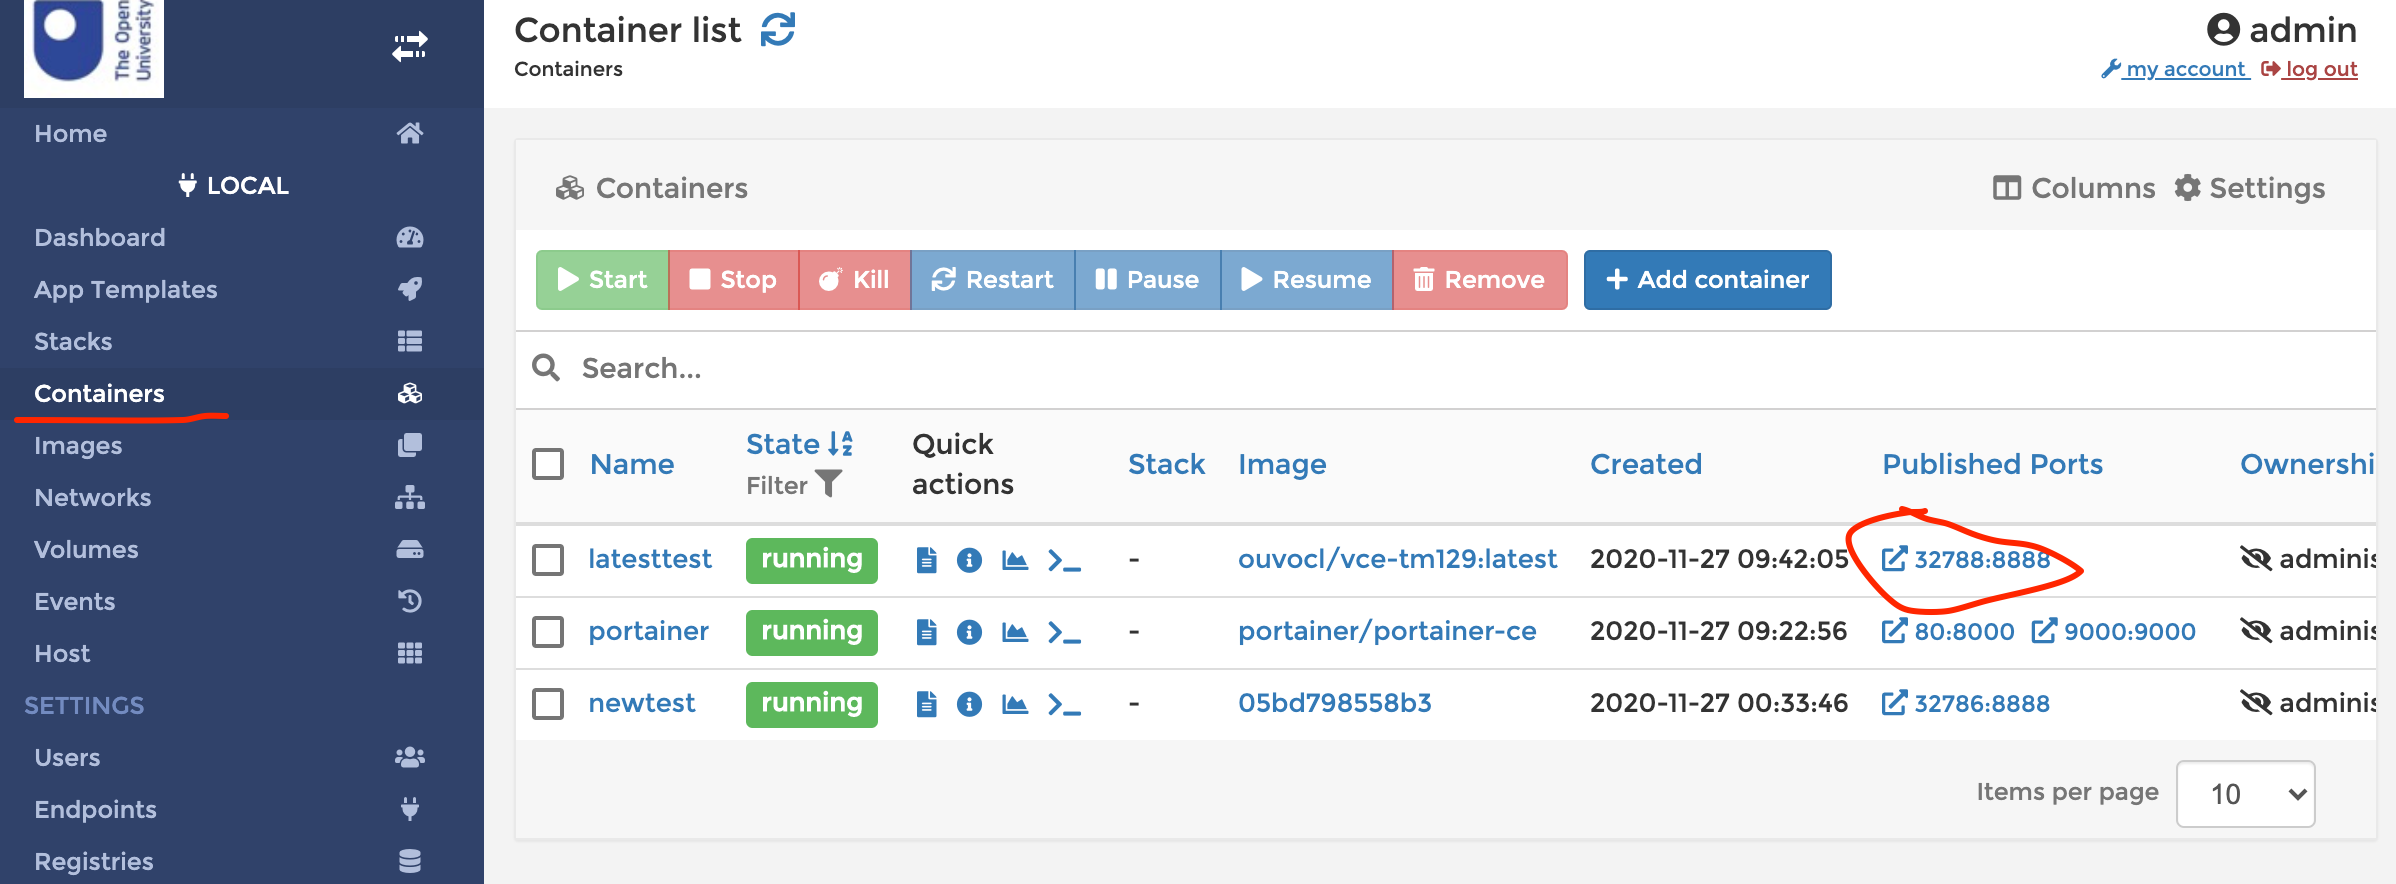
Access the container from the Containers page:
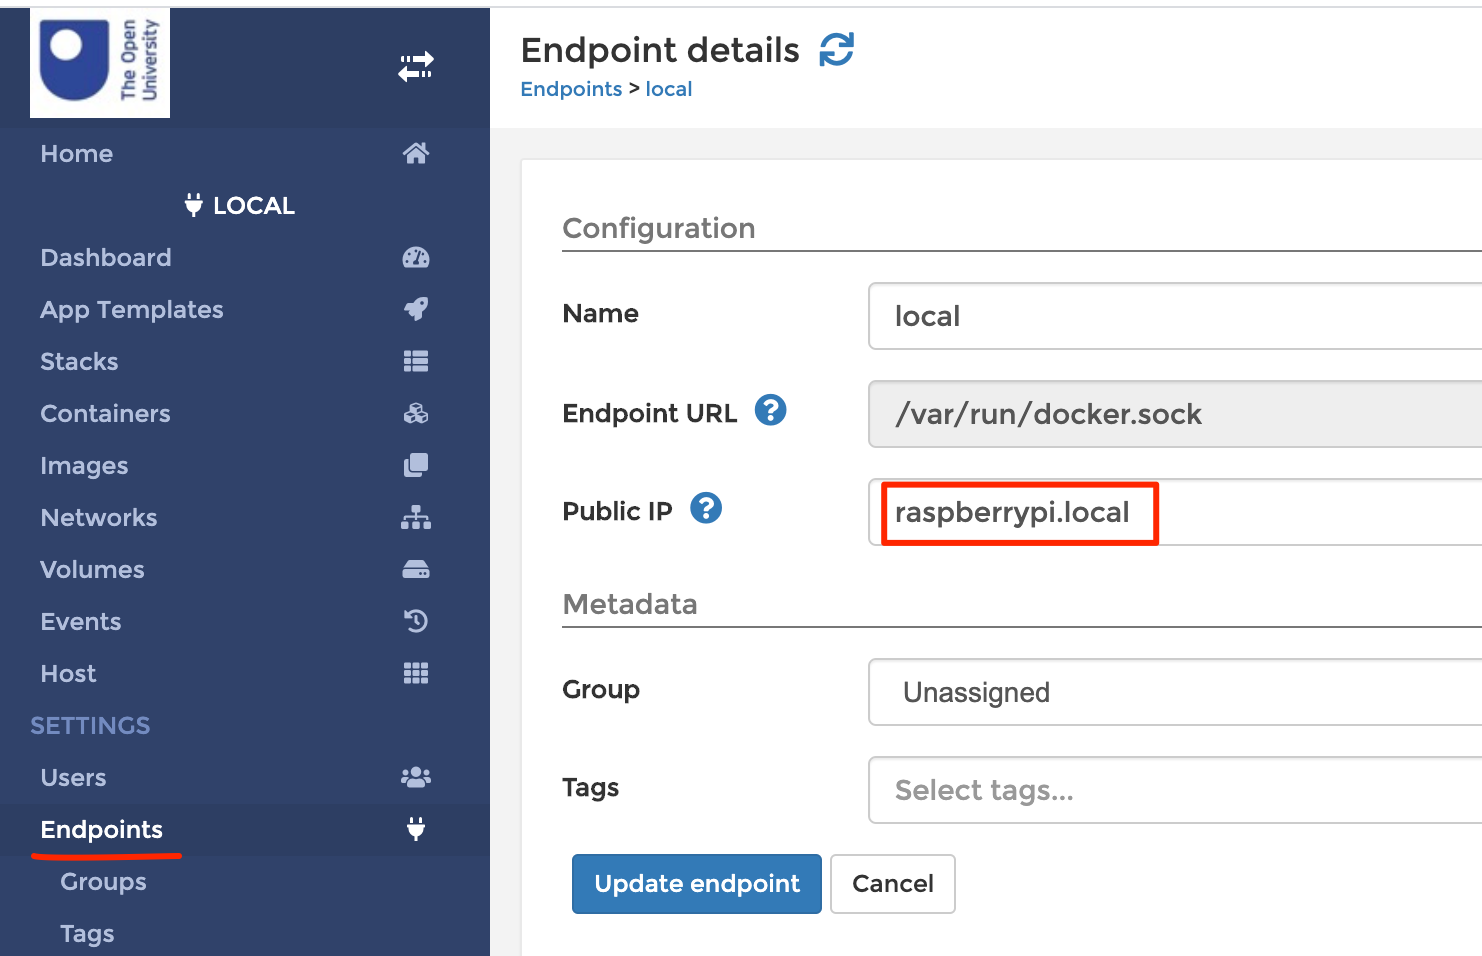
By default, when you launch a container, it is opened onto the domain 0.0.0.0. This can be changed to the actual required domain via the Endpoints configuration page. For example, my Raspberry Pi appears on raspberrypi.local, so if I’m running portainer against that local Docker endpoint, I can configure the path as follows:
>I should be able to generate Docker images for the 64 bit RPi O/S too, but need to get a new SD card… Feel free to chip in to help pay for bits and bobs — SD cards, cables, server hosting, an RPi 8GB and case, etc — or a quick virtual coffee along the way…
The magic that allows containers to be downloaded to Raspberry Pi devices or desktop machines is based on:
Docker cross-builds (buildx), which allow you to build containers targeted to different processors;
Docker manifest lists that let you create an index of images targeted to different processors and associate them with a single "virtual" image. You can then docker pull X and depending on the hardware you’re running on, the appropriate image will be pulled down.
Here’s a quick summary of the images so far; generally, they either run just on desktop machines (specifically, these are amd64 images, but I think that’s the default for Docker images anyway? At least until folk start buying the new M1 Macs.:
Jupyter notebook (oulocl/vce-jupyter): a notebook server based on andresvidal/jupyter-armv7l because it worked on RPi; this image runs on desktop and RPi computers. I guess I can now start iterating on it to make a solid base Jupyter server image. The image also bundles pandas, matplotlib, numpy, scipy and sklearn. These seem to take forever to build using buildx so I built wheels natively on an RPi and added them to the repo so the packages can be installed directly from the wheels. Pyhton wheels are named according to a convention which bakes in things like the Python version and processor architecture that the wheel is compiled for.
the OpenRefine container should run absolutely everywhere: it was built using support for a wide range of processor architectures;
the TM351 VCE image is the one we shipped to TM351 students in October; desktop machines only at the moment…
the TM129 Robotics image is the one we are starting to ship to TM129 students right now; it needs a rebuild because it’s a bit bloated, but I’m wary of doing that with students about to start; hopefully I’ll have a cleaner build for the February start;
the TM129 POC image is a test image to try to get the TM129 stuff running on an RPi; it seems to, but the container is full of all sorts of crap as I tried to get it to build the first time. I should now try to build a cleaner image, but I should really refactor the packages that bundle the TM129 software first because they distribute the installation weight and difficulty in the wrong way.
the Jupyter Postgres stack is a simple Docker Compose proof of concept that runs a Jupyter server in one container and a PostgreSQL server in a second, linked container. This is perhaps the best way to actually distribute the TM351 environment, rather than the monolithic bundle. At the moment, the Jupyter environment is way short of the TM351 environment in terms of installed Python packages etc., and the Postgres database is unseeded.
TM351 also runs a Mongo database, but there are no recent or supported 32 bit Mongo databases any more so that will have to wait till I get a 64 bit O/S running on my RPi. A test demo with an old/legacy 32 bit Mongo image did work okay in a docker-compose portainer stack, and I could talk to it from the Jupyter notebook. It’s a bit of a pain because it means we won’t be able to have the same image running on 32 and 64 bit RPis. And TM351 requires a relatively recent version of Mongo (old versions lack some essentially functionality…).
In the liminal space between sleep and wakefulness of earlier this morning, several pieces of things I’ve been pondering for years seemed to come together:
from years ago, digital application library shelves;
from months ago, a containerised Open Computing Lab <- very deprecated; things have moved on…)
from the weekend, trying to get TM129 and TM351 software running in containers on a Raspberry Pi 400;
from yesterday, a quick sketch with Portainer.
And today, the jigsaw assembled itself in the form of a local Open Computing Lab environment.
This combines a centrally provided, consistently packaged approach to the delivery of self-contained virtualised computational environments (VCEs) in the form of Docker containerised services and applications accessed over http) with a self-hosted (locally or remotely) via an environment that provides discovery, retrieval and deployment of these VCEs.
At the moment, for TM351 (live in October 2020), we have a model where students on the local install route (we also have a hosted offering):
download and install Docker
from the command line, pull the TM351 VCE
from the command line, start up the VCE and then access it from the browser.
In TM129, there is a slightly simpler route available:
download and install Docker
from the command line, pull the TM129 VCE
using the graphical Docker Dashboard (Windows and Mac), launch and manage the container.
The difference arises from the way a default Jupyter login token is set in the TM129 container, but a random token is generated in the TM351 VCE, which makes logging in trickier. At the moment, we can’t set the token (as an environment variable) via the Docker Dashboard, so getting into the TM351 container is fiddly. (Easily done, but another step that requires fiddly instructions.)
Tinkering with the Raspberry Pi over the last few days, and thinking about the easiest route to setting it up as a Docker engine server that can be connected to over a network, @kleinee reminded me in a Twitter exchange of the open-source portainer application [repo], a browser based UI for managing Docker environments.
Portainer offers several things:
the ability to connect to local or remote Docker Engines
the ability to manage Docker images, inclduing pulling them from a specified repo (DockerHub, or a private repo)
the ability to manage containers (start, stop, inspect, view logs, etc); this includes the ability to set environment variables at start-up
the ability to run compositions
a JSON feed powered menu listing a curated set of images / compositions.
So how might this work?
download and install Docker
pull a lOCL portainer Docker image and set it running
login
connect to a Docker Engine; in the screenshot below, the Portainer application is running on my RPi
view the list of course VCEs
select one of the listed VCEs to run it using it’s predefined settings
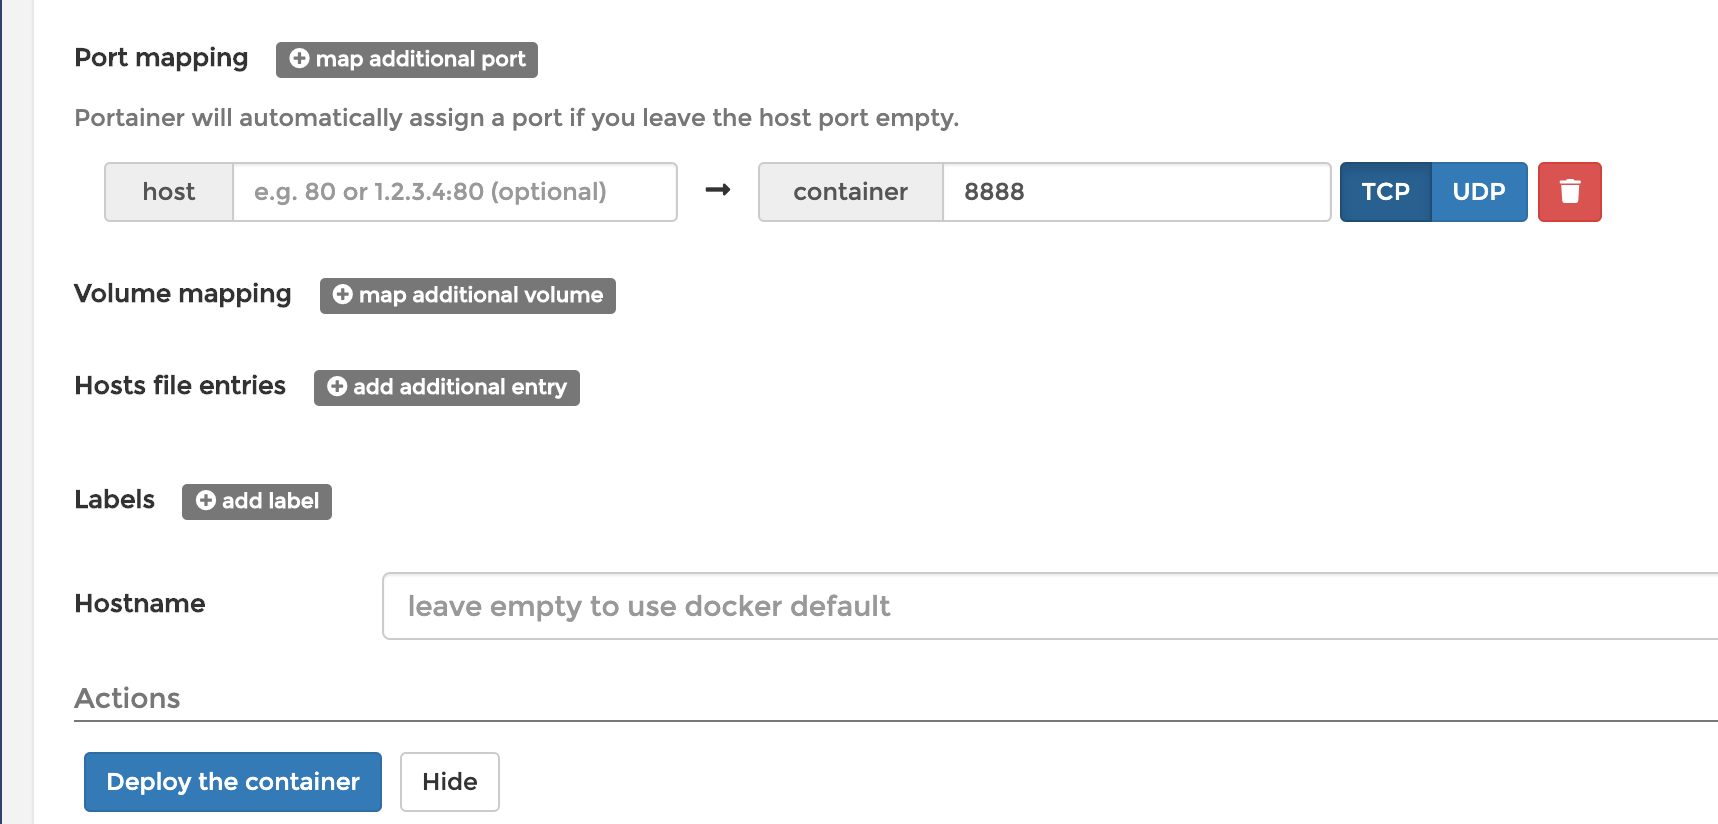
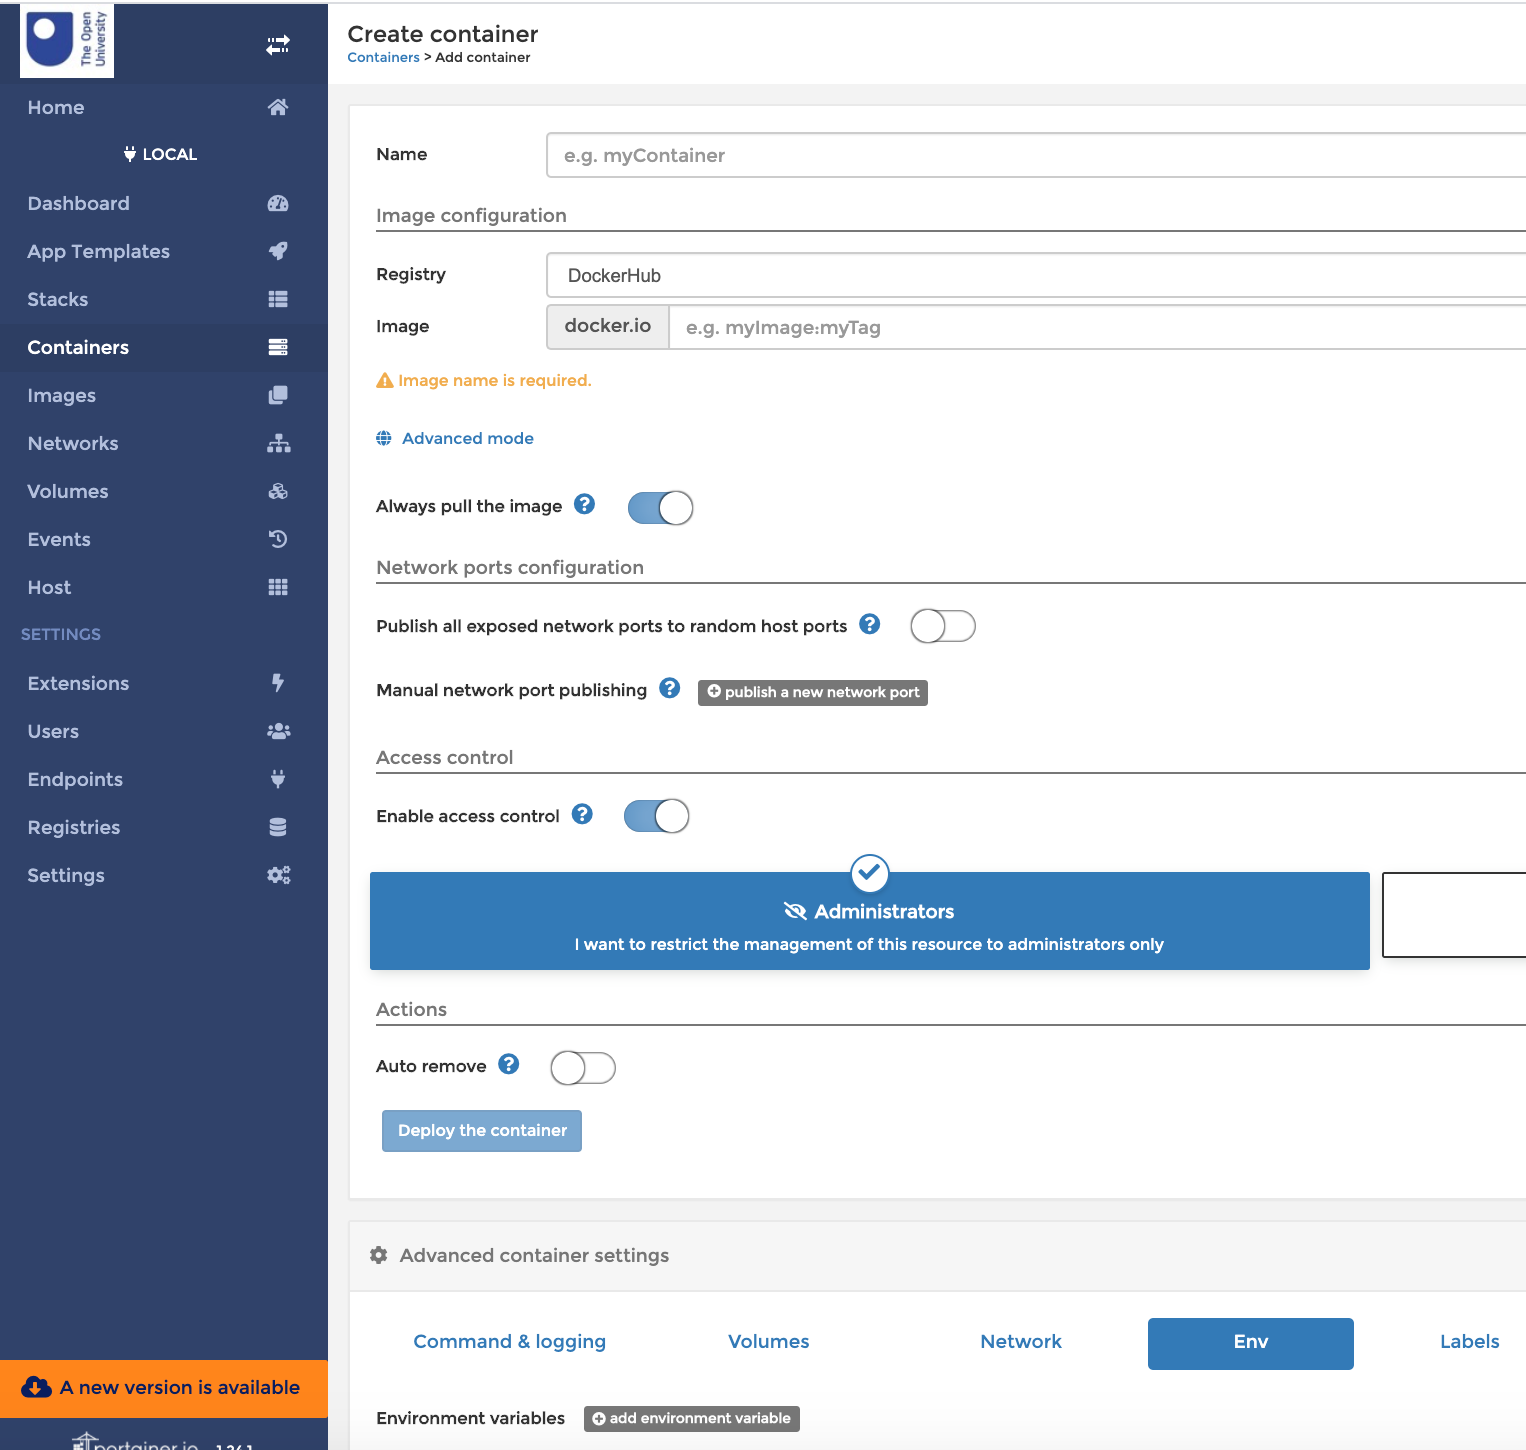
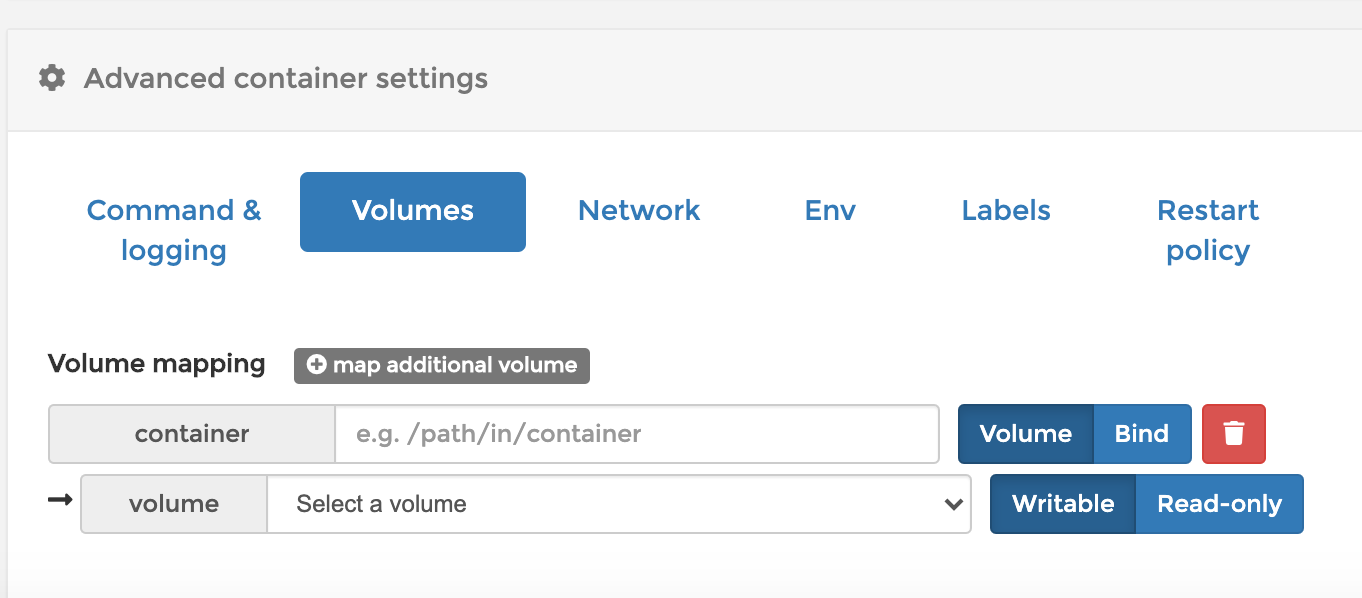
customise container settings via advanced options
we can also create a container from scratch, including setting environment variables, start directories etc
we can specify volume mounts etc
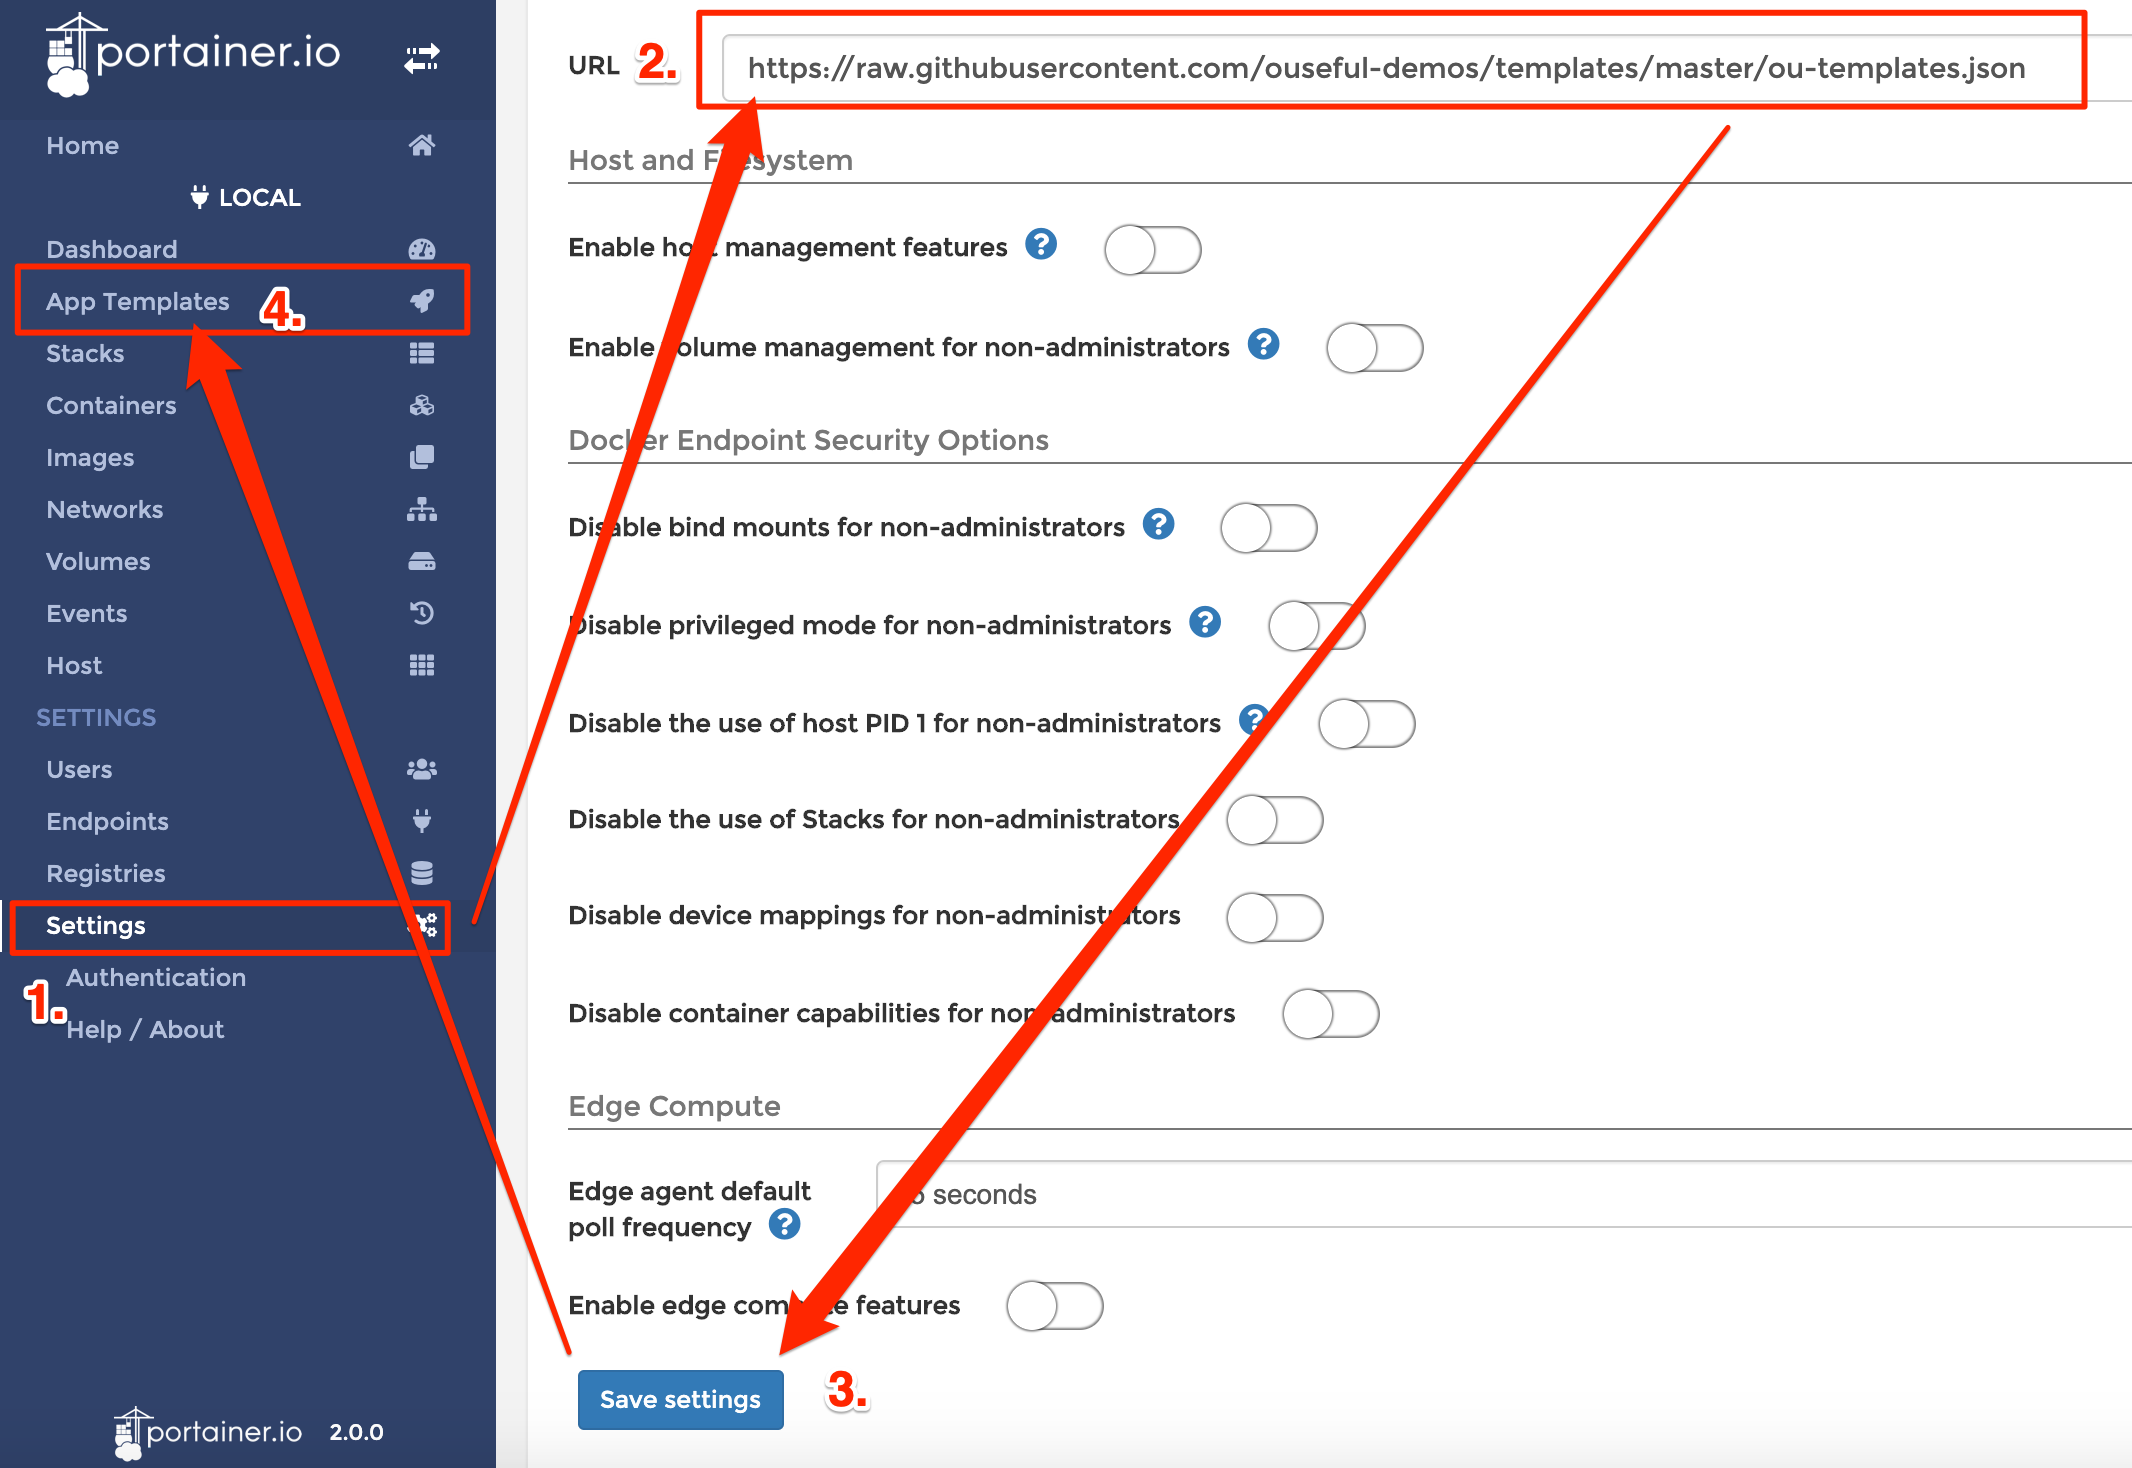
All the above uses the default UI, with custom settings via a control panel to set the logo and specify the application template feed (the one I was using is here).
I’m also using the old portainer UI (I think) and need to try out the new one (v2.0).
So… next steps?
fork the portainer repo and do a simplified version of it (or at least, perhaps such CSS display:none some of the more confusing elements, perhaps toggled with a ‘simple/full UI’ button somewhere
cross build the image for desktop machines (Win, Mac etc) and RPi
cross build TM351 and TM129 VCE images for desktop machines and RPi, and perhaps also some other demo containers, such as a minimal OU branded Jupyter notebook server and perhaps an edge demo OU branded Jupyter server with lots of my extensions pre-installed. Maybe an package up an environment and teaching materials for the OpenLearn Learn to Code for Data Analysis course as a demo for how OpenLearn might be able to make use of this approach
instructions for set up on:
desktop computer (Mac, Win, Linux)
RPi
remote host (Digital Ocean is perhaps simplest; portainer does have a tab for setting up against Azure, but it seems to require finding all sorts of fiddly tokens)
Two days, I reckon, to pull bits together (so four or five, when it doesn’t all "just" work ;-)
Not being the sort of person to bid for projects that require project plans and progress reports and end of project reports, and administration, and funding that you have to spend on things that don’t actually help, I tend to use this blog to keep track of things I’ve done in the form of blog posts, as well as links to summary presentations of work in progress (there is nothing ever other than work in progress…).
But I’ve not really been blogging as much as I should, so here’s a couple of links to presentations that I gave last week relating to the TM129 update:
Introducing RoboLab: an integrated robot simulator and Jupyter notebook environment for teaching and learning basic robot programming: this presentation relates to the RoboLab environment I’ve been working that integrates a Javascript robot simulator based on ev3devsim in a jupyter_proxy_widget with Jupyter notebook based instructional material. RoboLab makes heavy use of Jupyter magics to control the simulator, download programs to it, and retrieve logged sensor data from it. I think it’s interesting but no-one else seems to. I had to learn a load of stuff along the way: Javascript, HTML and CSS not the least among them.
Using Docker to deliver virtual computing environments (VCEs) to distance education students: this represents some sort of summary about my thinking around delivering virtualised software to students in Docker containers. We’ve actually be serving containers via Kubernetes on Azure using LTI-authed links from the Moodle VLE to launch temporary Jupyter notebook servers via an OU hosted JupyterHub server since Spring, 2018, and shipped the TM351 VCE (virtual computing environment) to TM351 students this October, with TM129 students getting starting to access their Dockerised VCE, which also bundles all the practical activity instructional notebooks. I believe that the institution is looking to run a "pathfinder" project (?) regarding making containerised environments avaliable to students in October, 2021. #ffs Nice to know when your work is appreciated, not… At least someone will make some internal capital in promotion and bonus rounds from that groundbreaking pathfinder work via OU internal achievement award recognition in 2022.
The TM129 materials also bundle some neural network / MLP / CNN activities that I intend to write up in a similar way at some point (next week maybe; but the notes take f****g hours to write…). I think some of the twists in the way the material is presented is quite novel, but then, wtf do I know.
There’s also bits and bobs I explored relating to embedding audio feedback into RoboLab, which I thought might aid accessibility as well as providing a richer experience for all users. You’d have thought I might be able to find someone, anyone, in the org who might be interested in bouncing more ideas around that (we talk up our accessibilitiness(?!)), or maybe putting me straight about why it’s a really crappy and stupid thing to do, but could I find a single person willing to engage on that? Could I f**k…
In passing, I note I ranted about TM129 last year (Feb 2019) in I Just Try to Keep On Keeping On Looking at This Virtual(isation) Stuff…. Some things have moved on, some haven’t. I should probably do a reflective thing comparing that post with the things I ended up tinkering with as part of the TM129 Robotics block practical activity update, but then again, maybe I should go read a book or listen to some rally podcasts instead…
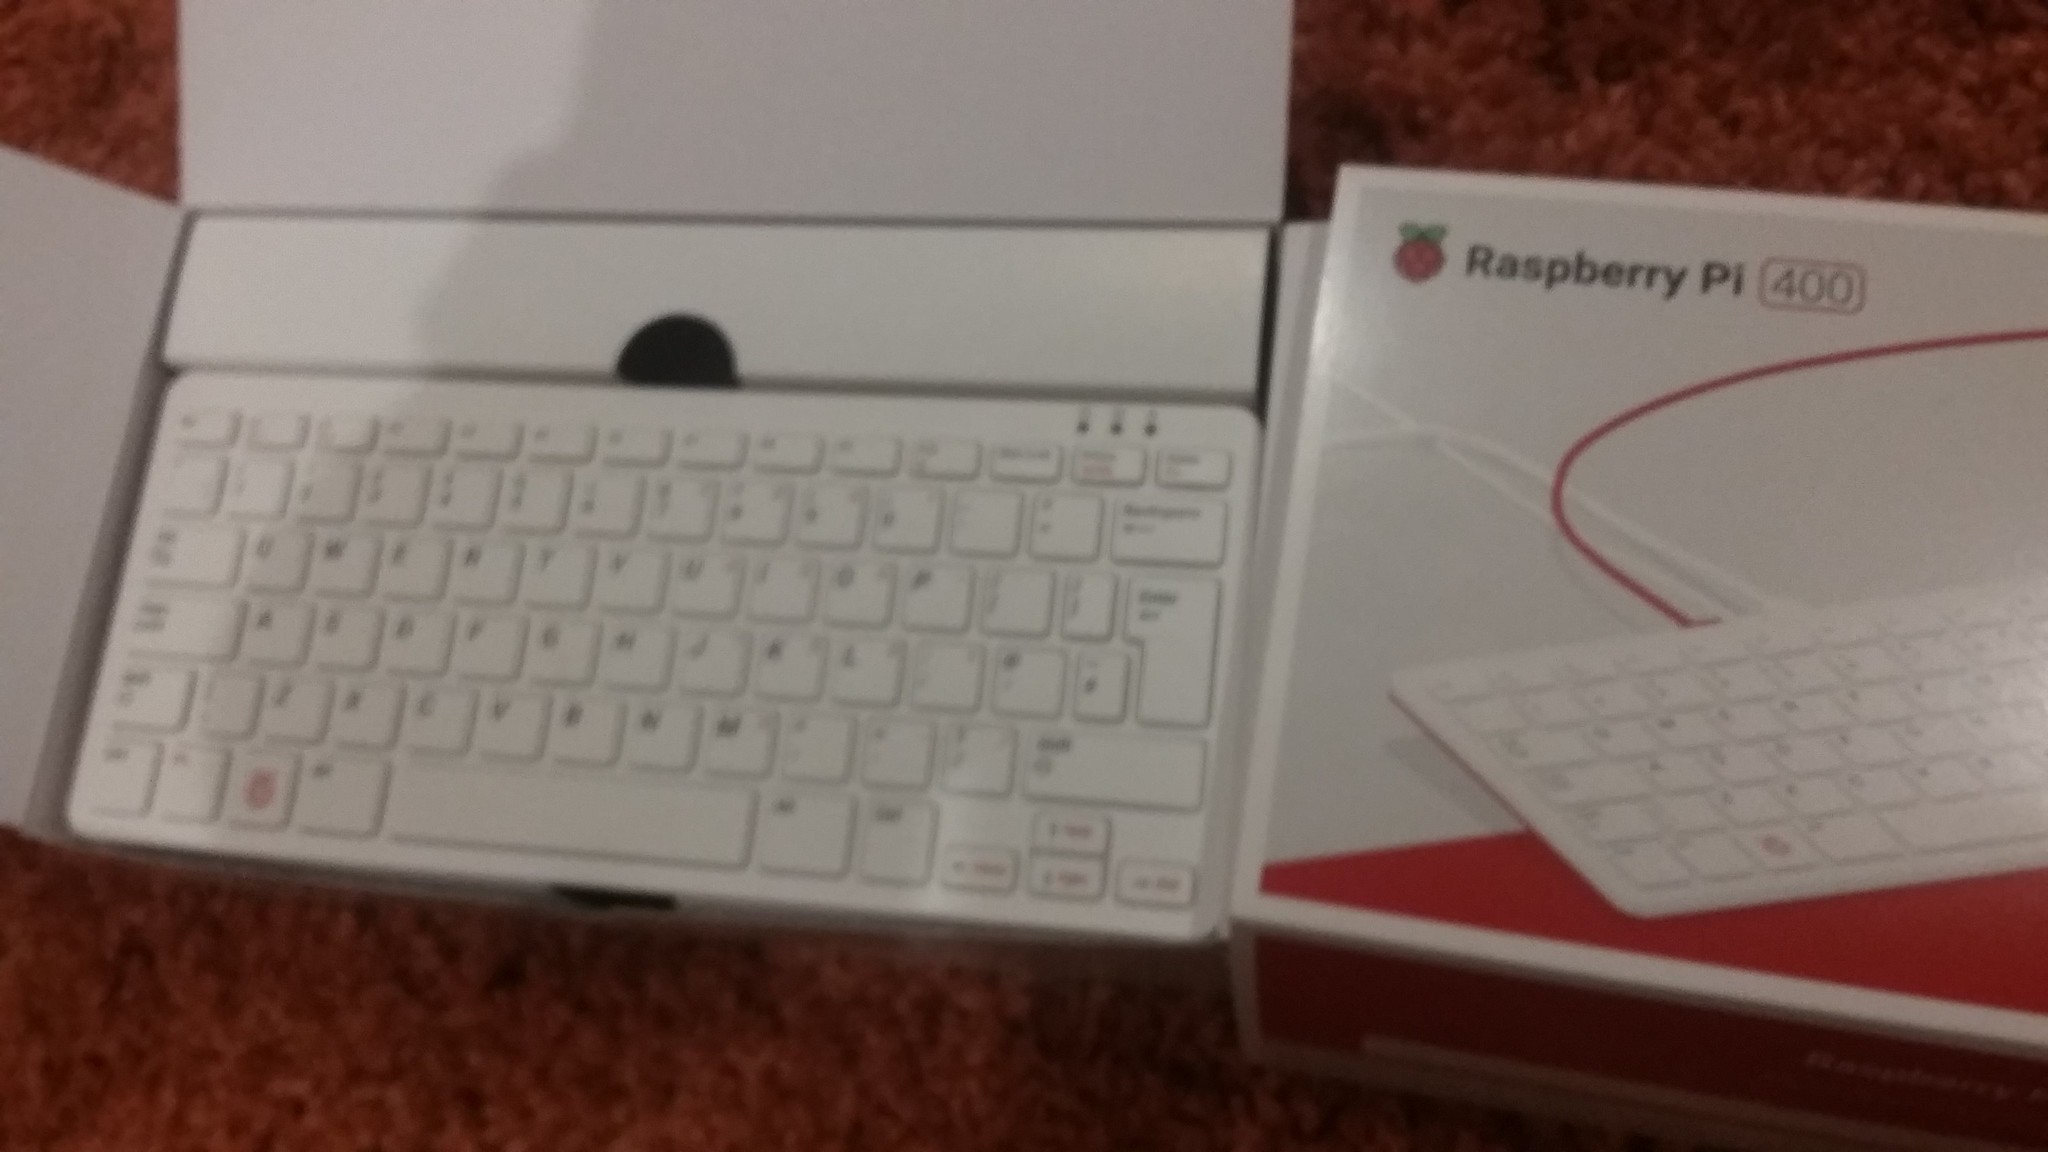
Some quick notes on a quick play with my Rapsberry Pi 400 keyboard thing…
Plugging it in to my Mac (having found the USB2ethernet dongle becuase Macs are too "thin" to have proper network sockets) and having realised the first USB socket I tried on my Mac doesn’t seem to work (no idea if this is at all, or just with the dongle) I plugged an ethernet between the Mac and the RPi 400, tried a ping which seemed to work:
ping raspberry.local
then tried to SSH in:
ssh pi@raspberry.local
No dice… seems that SSH is not enabled by default, so I had to find the mouse and HDMI cable, rewire the telly, go into the Raspberry Pi Configuration tool, Interfaces tab, and check the ssh option, unwire everything, reset the telly, redo the ethernet cable between Mac and RPi 400 and try again:
ssh pi@raspberry.local
and with the default raspberry password (unchanged, of course, or I might never get back in again!), I’m in. Yeah:-)
> I think the set-up just requires a mouse, but not a keyboard. If you buy a bare bones RPi, I think this means to get running you need: RPi+PSU+ethernet cable, then for the initial set-up: mouse + micro-HDMI cable + access to screen with HDMI input.
> You should also be able to just plug your RPi 400 into your home wifi router using an ethernet cable, and the device should appear (mine did…) at IP address-name raspberry.local.
> Security may be an issue so need to tell user to change the pi password when they have keyboard access. During setup, users could unplug the broadband in cable to their home router until they have a chance to reset the password, or swtich off wifi on their laptop etc if they set-up via an ethernet cable connection to the laptop etc.
Update everything (I’d set up the Raspberry Pi’s connection settings to our home wifi network when I first got it, though with a direct ethernet cable connection, you shouldn’t need to do that?):
sudo apt update && sudo apt upgrade -y
and we’re ready go…
Being of a trusting nature, I’m lazy enough to use the Docker convenience installation script:
docker run -p 8877:8888 -e JUPYTER_TOKEN="letmein" andresvidal/jupyter-armv7l
It certainly does… the notebook server is there and running on http://raspberrypi.local:8877 and the token letmein does what it says on the tin…
> For a more general solution, just install portainer (docker run -d -p 80:8000 -p 9000:9000 --name=portainer --restart=always -v /var/run/docker.sock:/var/run/docker.sock portainer/portainer-ce and then go to http://raspberry.local via a browser and you should be able to install / manage Docker images and containers via that UI.
Grab a container with a bloated TM129 style container (no content):
docker pull outm351dev/nbev3devsimruns
(note that you may need to free space on SD Cards; suggested delections somewhere further down this post).
Autostart container: sudo nano /etc/rc.local before the exit 0 add:
docker run -d -p 80:8888 --name tm129vce -e JUPYTER_TOKEN="letmein" outm351dev/nbev3devsimruns
Switch off / unplug RPi and switch it on again, server should be viewable at: http:raspberry.local with token letmein. Note that files are not mounted onto desktop. They could be but I think I heard somewhere that repeated backup writes every few seconds may degrade SD card over time?
How about if we try docker-compose?
This isn’t part of the docker package, so we need to install it separately:
pip3 install docker-compose
(I think that pip may be set up to implicitly use --extra-index-url=https://www.piwheels.org/simple which seems to try to download prebuilt RPi wheels from piwheels.org…?)
The following docker-compose.yaml file should load a notebook container wired to a PostgreSQL container.
It does, I can see the notebook server on http://raspberrypi.local:8866/.
Can we get a connection to the database server? Try the following in a notebook code cell:
# Let's install a host of possibly useful helpers...
%pip install psycopg2-binary sqlalchemy ipython-sql

# Load in the magic...
%load_ext sql

# Set up a connection string
PGCONN='postgresql://postgres:PGPass@postgres:5432/'

# Connect the magic...
%sql {PGCONN}
Then in a new notebook code cell:
%%sql
DROP TABLE IF EXISTS quickdemo CASCADE;
DROP TABLE IF EXISTS quickdemo2 CASCADE;
CREATE TABLE quickdemo(id INT, name VARCHAR(20), value INT);
INSERT INTO quickdemo VALUES(1,'This',12);
INSERT INTO quickdemo VALUES(2,'That',345);

SELECT * FROM quickdemo;
And that seems to work too:-)
How about the Mongo stuff?
%pip install pymongo
from pymongo import MongoClient
#Monolithic VM addressing - 'localhost',27351
# docker-compose connection - 'mongo', 27017

MONGOHOST='mongo'
MONGOPORT=27017
MONGOCONN='mongodb://{MONGOHOST}:{MONGOPORT}/'.format(MONGOHOST=MONGOHOST,MONGOPORT=MONGOPORT)

c = MongoClient(MONGOHOST, MONGOPORT)

# And test
db = c.get_database('test-database')
collection = db.test_collection
post_id = collection.insert_one({'test':'test record'})

c.list_database_names()
A quick try installing the ou-tm129-py package and it seemed to get stuck on the Installing build dependencies ... step, though I could install most packages separately, even if the builds were a bit slow (scikit-learn seemed to cause the grief?).
Running pip3 wheel PACKAGENAME seems to build .whl files into the local directory, so it might be worth creating some wheels and popping them on Github… The Dockerfile for the Jupyter container I’m using gives a crib:
# Copyright (c) Andres Vidal.
# Distributed under the terms of the MIT License.
FROM arm32v7/python:3.8

LABEL created_by=https://github.com/andresvidal/jupyter-armv7l
ARG wheelhouse=https://github.com/andresvidal/jupyter-armv7l/raw/master/wheelhouse

#...

RUN pip install \
    $wheelhouse/kiwisolver-1.1.0-cp38-cp38-linux_armv7l.whl # etc
Trying to the run the nbev3devsim package to load the nbev3devsimwidget, and jp_proxy_widget threw an error, so I raised an issue and it’s already been fixed… (thanks, Aaron:-)
Trying to install jp_proxy_widget from the repo threw an error — npm was missing — but the following seemed to fix that:
#https://gist.github.com/myrtleTree33/8080843

wget https://nodejs.org/dist/latest-v15.x/node-v15.2.0-linux-armv7l.tar.gz

#unpack
tar xvzf node-v15.2.0-linux-armv7l.tar.gz

mkdir -p /opt/node
cp -r node-v15.2.0-linux-armv7l/* /opt/node

#Add node to your path so you can call it with just "node"
#Add these lines to the file you opened

PROFILE_TEXT="
PATH=\$PATH:/opt/node/bin
export PATH
"
echo "$PROFILE_TEXT" >> ~/.bash_profile
source ~/.bash_profile

# linking for sudo node (TO FIX THIS - NODE DOES NOT NEED SUDO!!)
ln -s /opt/node/bin/node /usr/bin/node
ln -s /opt/node/lib/node /usr/lib/node
ln -s /opt/node/bin/npm /usr/bin/npm
ln -s /opt/node/bin/node-waf /usr/bin/node-waf
From the notebook code cell, nbev3devsim install requires way too much (there’s a lot of crap for the NN packages which I need to separate out… crap, crap, crap:-( Eveything just hangs on sklearn AND I DON"T NEED IT.
So presumably, with the simple 32 bit O/S we can’t use arm64v8/mongo and instead we need a 32 bit Mongo, which was deprecated in Mongo 3.2? Old version here: https://hub.docker.com/r/apcheamitru/arm32v7-mongo
But TM351 has a requirement on much more recent MongoDB… SO we maybe do need to a new SD card image? That could also be built as a much lighter custom image, perhaps with an OU customised dektop…
FROM arm32v7/alpine

#We need to install git so we can clone the OpenRefine repo
RUN apk update && apk upgrade && apk add --no-cache git bash openjdk8

MAINTAINER tony.hirst@gmail.com

#Download a couple of required packages
RUN apk update && apk add --no-cache wget bash

#We can pass variables into the build process via --build-arg variables
#We name them inside the Dockerfile using ARG, optionally setting a default value
#ARG RELEASE=3.1
ARG RELEASE=3.4.1

#ENV vars are environment variables that get baked into the image
#We can pass an ARG value into a final image by assigning it to an ENV variable
ENV RELEASE=$RELEASE

#There's a handy discussion of ARG versus ENV here:
#https://vsupalov.com/docker-arg-vs-env/

#Download a distribution archive file
RUN wget --no-check-certificate https://github.com/OpenRefine/OpenRefine/releases/download/$RELEASE/openrefine-linux-$RELEASE.tar.gz

#Unpack the archive file and clear away the original download file
RUN tar -xzf openrefine-linux-$RELEASE.tar.gz  && rm openrefine-linux-$RELEASE.tar.gz

#Create an OpenRefine project directory
RUN mkdir /mnt/refine

#Mount a Docker volume against the project directory
VOLUME /mnt/refine

#Expose the server port
EXPOSE 3333

#Create the state command.
#Note that the application is in a directory named after the release
#We use the environment variable to set the path correctly
CMD openrefine-$RELEASE/refine -i 0.0.0.0 -d /mnt/refine
# See what's available...
docker buildx ls

# Create a new build context (what advantage does this offer?)
docker buildx create --name rpibuilder

# Select the build context
docker buildx use rpibuilder

# And cross build the image for the 32 bit RPi o/s:
docker buildx build --platform linux/arm/v7 -t outm351dev/openrefinetest:latest --push .
Trying to buld the ou-tm129-py package into an image is taking forever on the sklearn build step. I wonder about setting up a buildx process to use something like Docker custom build outputs to genarate wheels. I wonder if this could be done via a Github Action with the result pushed to a Github repo?
Then install node in a child container for the patched jp_widget_proxy build (for some reason, pip doesn’t run in the Dockerfile: need to find the correct py / pip path):
FROM oneoffcoder/rpi-scikit

RUN wget https://nodejs.org/dist/latest-v15.x/node-v15.2.0-linux-armv7l.tar.gz

RUN tar xvzf node-v15.2.0-linux-armv7l.tar.gz

RUN mkdir -p /opt/node
RUN cp -r node-v15.2.0-linux-armv7l/* /opt/node

RUN ln -s /opt/node/bin/node /usr/bin/node
RUN ln -s /opt/node/lib/node /usr/lib/node
RUN ln -s /opt/node/bin/npm /usr/bin/npm
RUN ln -s /opt/node/bin/node-waf /usr/bin/node-waf
Should I fork this and start to build my own, more recent versions? They seem to use conda, which may simplify the sklearn installation? But it looks like recent Py supporting packages aren’t there? https://repo.anaconda.com/pkgs/free/linux-armv7l/ ARRGGHHHH.
WHere do the packages used for your current Python environment when using a Jupyter notebook live?
from distutils.sysconfig import get_python_lib
print(get_python_lib())
So.. I got scikit to pip install afteer who knows how long by installing from a Jupyter notebook code cell into the a container that I think was based on the following:
I donwnloaded the wheels from the notebook home page (select the files, clicl Download) so at the next attempt I’ll see if I can copy the wheels in via the Dockerfile and install sklearn from the wheel.
The image is way to heavy – and there is a lot of production crap in the `ou-tm129-py image that could be removed. But I got the simulator to run :-)
So nows the decision as to whether to try to pull together as lite a container as possible. Is it worth the effort?
Mounting but not COPYing wheels into a container
The Docker build secret Dockerfile feature looks like it will mount a file into the conatiner and let you use it but not actually leave the mouted file in a layer. So could we mount a wheel into the container and install from it, essentially giving a COPY...RUN ....&& rm *.wheel statement?
A recipe from @kleinee for building wheels (I think):
- run pipdeptree | grep -P '^\w+' >requirements.txt
in installation that works (python 3.7.3)
- shift requirements.txt into your 64 bit container with Python x.x and bulid-deps
- in dir containing requirements.txt run pip3 wheel --no-binary :all: -w . -r ./requirements.txt
So to get this running on a home network, you also need to add an ethernet cable (to connect to home router) and a mouse (so you can point and click to set ssh during setup), and have a micron-HDML2HDMI cable and access to a tv/monitor w/ HDMI input during setup, and then you’d be good to go?
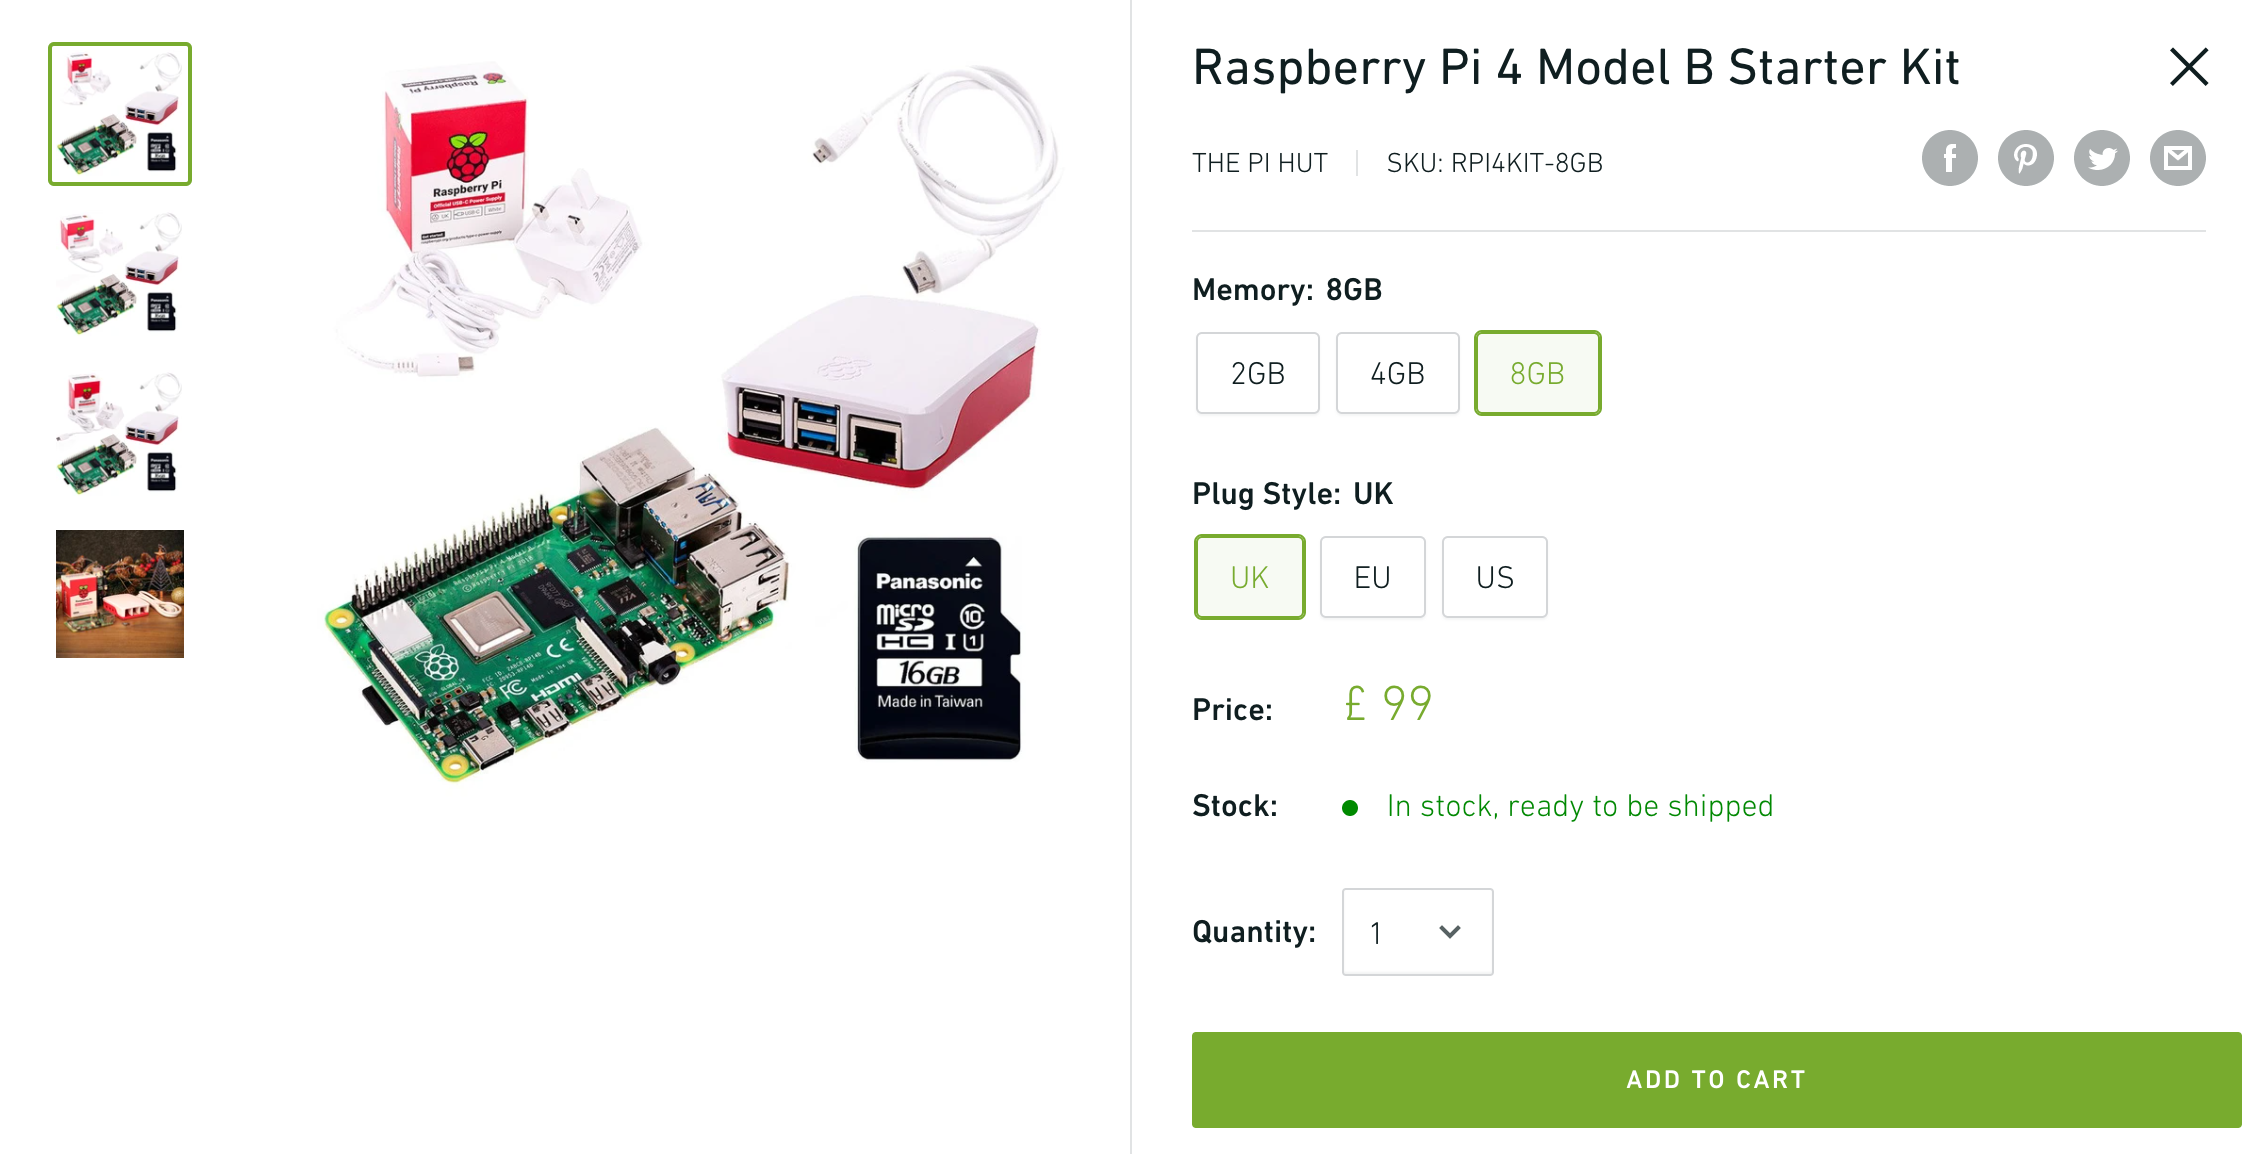
A couple of days ago, I noticed a new release from the Raspberry Pi folks, a "$70 computer" bundling a Raspberry Pi 4 inside a keyboard, with a mouse, power supply and HDMI cable all as part of the under a hundred quid "personal computer kit". Just add screen and network connection (ethernet cable, as well as screen, NOT provided).
Mine arrived today:
Raspberry Pi 400 Personal Computer Kit
So… over the last few months, I’ve been working on some revised material for a level 1 course. The practical computing environment, which is to be made available to students any time now for scheduled use from mid-December, is being shipped via a Docker image. Unlike the TM351 Docker environment (repo), which is just the computing environment, the TM129 Docker container (repo) also contains the instructional activity notebooks.
One of the issues with providing materials this way is that students need a computer that can run Docker. Laptops and desktop computers running Windows or MacOS are fine, but if you have a tablet, cheap Chromebook, or just a phone, you’re stuck. Whilst the software shipped in the Docker image is all accessed through a browser, you still need a "proper" computer to run the server…
Challenges using Raspberry Pis as home computing infrastructure
For a long time, several of us have muttered about the possibility of distributing software to students that can run on a Raspberry Pi, shipping the software on a custom programmed SD card. This is fine, but there are several hurdles to overcome, and the target user (eg someone whose only computer is a phone or a tablet) is likely to be the least confident sort of computer user at a "system" level. For example, to use the Raspberry Pi from a standing start, you really need access to:
a screen with an HDMI input (many TVs offer this);
a USB keyboard (yeah, right: not in my house for years, now…)
a USB mouse (likewise);
an ethernet cable (because that’s the easiest way to connect to you home broadband router, at least to start with).
You might also try to get your Raspberry Pi to speak to you if you can connect it to your local network, for example to tell you what IP address it’s on, but then you need an audio output device (the HDMI’d screen may do it, or you need a headset/speaker/set of earphones with an appropriate connector).
Considering these hurdles, the new RPi-containing keyboard, makes it easier to "just get started", particularly if purchased as part of the Personal Computer Kit: all you need is a screen if the SD card has all the software you need.
So I’m wondering again if this is a bit closer to the sort of thing we might give to students when they sign up with the OU: a branded RPi keyboard, with a custom SD card for each module or perhaps a single custom SD card and then a branded USB memory stick with additional software applications required for each module.
All the student needs to provide is a screen. And if we can ship a screensharing or collaborative editing environment (think: Google docs collaborative editing) as part of the software environment, then if a student can connect their phone or tablet to a server running from their keyboard, we could even get away without a phone.
The main challenges are still setting up a connection to a screen or setting up a network connection to a device with a screen.
> Notes from setting up my RPi 4000: don’t admit to having a black border on your screen: I did and lost the the desktop upper toolbar off the top of my TV and had to dive into a config file to reset it, eg as per instructions here: run sudo nano /boot/config.txt then comment out line: #disable_overscan=1
Building software distributions
As far as going software environments to work with the RPi, I had a quick poke around and there are several possible tools that could help.
One approach I am keen on is using Docker containers to distribute images, particularly if we can build images for different platfroms from the same build scripts.
Installing Docker on the RPi looks simple enough, eg this post suggests the following is enough:
A quick look for arm32 images on DockerHub turns up a few handy looking images, particulalry if you work with a docker-compose architecture to wire different containers together to provide the student computing environment, and there are examples out there of building Jupyter server RPi Docker images from these base containers (that repo includes some prevbuilt arm python package wheels; other pre-built packages can be found on piwheels.org). See also: jupyter-lab-docker-rpi (h/t @dpmcdade) for a Docker container route and kleinee/jns for a desktop install route.
The Docker buildx cross-builder offers another route. This is available via Docker Desktop if uou enable experimental CLI features and should support cross-building of images targeted to the RPi Arm processor, as described here.
Alternatively, it looks like there is at least one possible Github Action out there that will build an Arm7 targeted image and push it to a Docker image hub? (I’m not sure if the official Docker Github Action supports cross-builds?)
For building full SD card images, this Dockerised pi-builder should do the trick?
So, for my to do list, I think I’ll have a go at seeing whether I can build an RPi runnable docker-compose version of the TM351 environment (partitioning the services into separate containers that can then be composed back together has been on my to do list for some time, so this way I can explore two things at once…) and also have a go at building an RPi Docker image for the TM129 software. The TM129 release might also be interesting to try in the context of an SD Card image with the software installed on the desktop and, following the suggestion of a couple f colleagues, accessed via an xfce4 desktop in kiosk mode perhaps via a minimal o/s such as DietPi.
PS also wonders – anyone know of a jupyter-rpi-repodocker that will do the repo2docker thing on Raspberry Pi platforms…?!