Despite seeing talk of Jupyter notebook integration in Microsoft Visual Studio (VS) Code, I didn’t do much more than pass it on (via the Tracking Juptyer newsletter) because I though it was part of a heavyweight Visual Studio IDE.
Not so.
Microsoft Visual Studio Code is an electron app, reminiscent-ish of Atom editor (maybe?) that’s available as a quite compact download across Windows, Mac and Linux platforms.
Navigating the VS Code UI is probably the hardest part of connecting it to a Jupyter kernel, remote or local, so let’s see what’s involved.
If you haven’t got VS Code installed, you’ll need to download and install it.
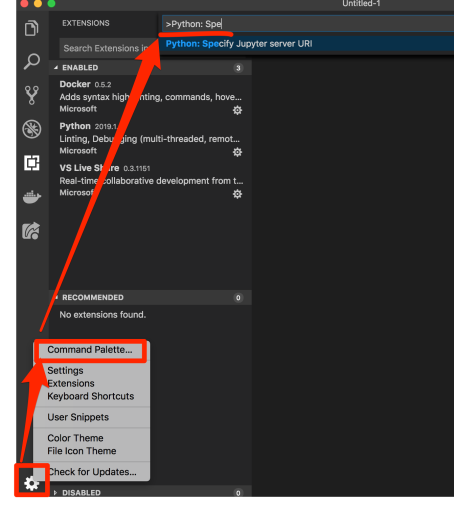
Install the Python extension and reload…

Now let’s go hunting for the connection dialogue…
From the Command Palette, search for Python: Specify Jupyter server URI (there may be an easier way: I’ve spent all of five minutes with this environment!):
 You’ll be prompted with another dialogue. Select the Type in the URI to connect to a running Jupyter server option:

and you’ll be prompted for a URI. But what URI?
Let’s launch a Digital Ocean server.
If you don’t have a Digital Ocean account you can create one here and get $100 free credit, which is way more than enough for this demo.
Creating a server is quite straightforward. There’s an example recipe here — you’ll need to create as one click app a Docker server, select your region and server size (a cheap 2GB server will be plenty), and then enter the following into the User data area:
#!/bin/bash

docker run -d --rm -p 80:8888 -e JUPYTER_TOKEN=letmein jupyter/minimal-notebook

You can now create your server (optionally naming it for convenience):

The server will be launched and after a moment or two it will be assigned a public IP address. Copy this address and paste it into a browser location bar — this is just to help us monitor when the Jupyter server is ready (it will probably take a minute or two to download and install the notebook container into the server).

When you see the notebook server (no need to log in, unless you want to; the token is letmein, or whatever you set it to in the User data form), you can enter the following into the VS Code server URI form using the IP address of your server:
http://IPDDRESS?token=letmein

In VS Code, raise the Command Palette… again and start to search for Pythin: Show Python Interactive window.

When you select it, a new interactive Python tab will be opened, connected to the remote server.

You should now be able to interact with your remote IPython kernel running on a Digital Ocean server.
See Working with Jupyter Notebooks in Visual Studio Code for some ideas of what to do next… (I should probably work through this too…)
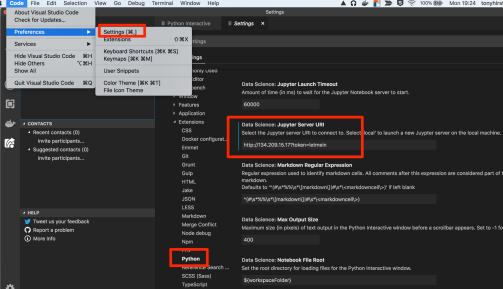
If you want to change the remote Jupyter kernel URL, you either need to quit VS Code, restart it, and go through the adding a connection URI process again, or dip into the preferences (h/t Nick H. in the TM351 forums for that spot):
When you’re done, go back to the Digital Ocean control panel and destroy the droplet you created. If you don’t, you’ll continue to be billed at its hourly rate for each hour, or part thereof, that you keep it around (switched or not; there’s still a rental charge… If you treat the servers as temporary servers, and destroy them when you’re done, your $100 can go a long way…)
