For years and years I;ve been hassling my evil twin brother (it’s a long story) Jim Groom about getting Docker hosting up and running as part of Reclaim, so when an invite to the Reclaim Cloud beta arrived today (thanks, Jim:-), I had a quick play (with more to come in following days and weeks, hopefully… or at least until he switches my credit off;-)
For an early example of how to get JupyterHub up and running on Reclaim Cloud, see https://github.com/ousefulReclaimed/jupyterhub-docker/ . Best practice around this currently (July ’21) seems to be Tim Sherratt’s (@wragge) GLAM Workbench on Reclaim Cloud recipes.
The environment is provided by Jelastic, (I’m not sure how the business model will work, eg in terms of what’s being licensed and what’s being resold…?).
Whilst there are probably docs, the test of a good environment is how far you can get by just clicking buttons, so here’s a quick recap of my first foray…
Let’s be having a new environment then..

Docker looks like a good choice:
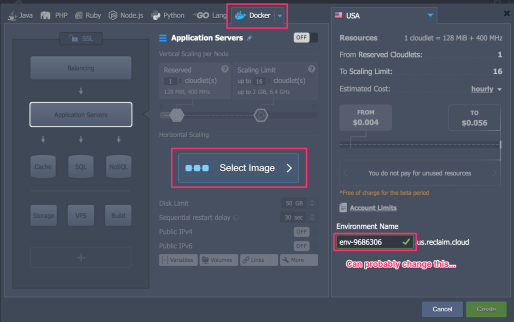
Seems like we can search for public DockerHub containers (and maybe also provate ones if we provide credentials?).
I’ll use one of my own containers, that is built on top of an official Jupyter stack container:

Select one and next, and a block is highlighted to show we’ve configured it…

When you click apply, you see loads of stuff available…

I’m going to cheat now… the first time round I forgot a step, and that step was setting a token to get into the Jupyter notebook.
If you look at my repo docs for the container I selected, you see that I recommend setting the Jupyter login token via an environment variable…

In the confusing screen, there’s a {...} Variables option that I guessed might help with that:

Just in passing, if your network connection breaks in a session, we get a warning and it tries to reconnect after a short period:

Apply the env var and hit the create button on the bewildering page:

And after a couple of minutes, it looks like we have a container running on a public IP address:

Which doesn’t work:

And it doesn’t work becuase the notebook isnlt listening on port 80, it autostarts on port 8888. So we need to look for a port map:

A bit of guessing now – we porbbaly want an http port, which nominally maps, or at least default, to port 80? And then map that to the port the notebook server is listening on?

Add that and things now look like this as far as the endpoints go:

Try the public URL again, on the insecure http address:

Does Jim Rock?

Yes he does, and we’re in…
So what else is there? Does it work over https?

Hmmm… Let’s go poking around again and see if we can change the setup:

So, in the architecture diagram on the left, if we click the top Balancing block, we can get a load balancer and reverse proxy, which are the sorts of thing that can often handle certificates for us:

I’ll go for Nginx, cos I’ve heard of that…

It’s like a board game, isn’t it, where you get to put tokens on your personal board as you build your engine?! :-)

It takes a couple of mins to fire up the load balancer container (which is surely what it is?):

If we now have a look in the marketplace (I have to admit, I’d had skimmed through this at the start, and noticed there was something handy there…) we can see a Let’s Encrypt free SSL certificate:

Let’s have one of those then…

I’ll let you into another revisionist secret… I’d tried to install the SSL cert without the load balancer, but it refused to apply it to my container… and it really looked like it wanted to apply to something else. Which is what made me thing of the nginx server…

Again we need to wait for it to be applied:

When it is, I donlt spot anyhting obvious to show the Let’s Encrypt cert is there, but I did get a confirmation (not shown in screenshots).

So can we log in via https?

Bah.. that’s a sort of yes, isn’t it? The cert’s there:

but there’s http traffic passing through, presumably?
I guess I maybe need another endpoint? https onto port 8888?
I didn’t try at the time — that’s for next time — becuase what I actually did was to save Jim’s pennies…

And confirm…
 So… no more than half an hour from a zero start (I was actually tinkering whilst on a call, so only half paying attention too…).
As for the container I used, that was built and pushed to DockerHub by other tools.
The container was originally defined in a Github repo to run on MyBinder using not a Dockerfile, but requirements.txt and apt.txt text files in a binder/ directory.

The Dockerhub image was built using a Github Action:

And for that to be able to push from Github to DockerHub, I had to share my DockerHub username and password as a secret with the Github repo:

But with that done, when I make a release of the repo, having tested it on MyBinder, an image is automatically built and pushed to Dockerhub. And when it’s there, I can pull it into Reclaim Cloud and run it as my own personal service.
Thanks, Jim..
PS It’s too late to play more today now, and this blog post has taken twice as long to write as it took me to get a Jupyter notebook sever up an running from scratch, but things on my to do list next are:
1) see if I can get the https access working;
2) crib from this recipe and this repo to see if I can get a multi-user JupyterHub with a Dockerspawner up and running from a simple Docker Compose script. (I can probably drop the Traefik proxy and Let’s Encrypt steps and just focus on the JupyerHub config; the Nginx reverse proxy can then fill the gap, presumably…)

Hi Tony,
It’s apparent you’ve been in this rodeo before :) I really appreciate you taking it for a spin and working through the interface without a seatbelt. The idea that Jupyter Notebook could stage a revival in the Reclaim Cloud is exciting :) There is also a way to use Github and Docker compose files to spin up containers not in Dockerhub, which I still need to play with. You are already beyond me, but I think a 1-click Jupyter installer might be something we would love to chat about given your familiarity with what might work for schools. Tim has already created an isntaller for ShinyApps and RStudio, and from what I understand there are many more on the way.
So, let this comment testify that while Jim Rocks might sounds good, Tony Rocks is more akin to the the truth!
Hi Jim
The docker-compose thing was my next step (I’m trying to figure things out one step at a time and there are only so many hours in a day!;-)
docker-compose demo using Jupyterhub here: https://github.com/ouseful-testing/jupyterhub-docker I need to write it up, but the half hour to get it working then takes another 90 mins to write up.
The route to getting the docker compose thing is fiddly — requires a git clone step becuase there are files other than the dokcer compose atm, although I could build and push those separately I guess; so I reckon I need maybe an hour to try that out too and see if I can just get down to a straightforward compose file on its own. But my head is a bit fried atm and I intend to try to take some time away from keyboard Fri-Sun so may not get round to it till next week…
@jim and wtf fo you mean revival? This is Jupyter stuff giving Reclaim.Cloud a chance to be relevant!;-)