Moving PostgreSQL and MongoDB Data Directories to User Home

In the online hosted computing lab we now use to provide a hosted solution for module based docker containers, persistent storage is mounted into a launched container at /home/ou/MODULECODE-PRESENTATIONCODE. For modules that use databases that students might modify, this means we need to move the database data directories into the users home directory somewhere.

Here’s a copy of the script I’ve been dabbling with to try to do that. It runs when the container is started, after the home directory volume has been mounted:

#! /bin/bash

# Location: /etc/ou_local_db_path/local_db_path.sh

LOCAL_HOME=/home/ou/TM351-23J

mkdir -p $LOCAL_HOME/openrefine
chown ou:users $LOCAL_HOME/openrefine

# If required, don't run any more of this script
if [ -f "$LOCAL_HOME/.no_local_db_path" ]; then
    echo "Not running local db scripts"
    exit 0
fi

## DATABASE MIGRATION

# The Mongo and Postgres data directories can be mounted 
# to the persistent storage that is provided by the Open Computing Lab.
#
# Migration happens if:
#
# - /home/ou/MODULE-PRESENTATION/.no_mount does not exist
# - /home/ou/MODULE-PRESENTATION/.local_DBTYPE does not exist (for DBTYPE postgres, mongo)
#
# The .no_mount file will be clobbered if a volume is mounted over /home/ou/MODULE-PRESENTATION/ ;
# this means databases *will* be copied when the container is run in the VCE.
# Databases *will* be copied to host for locally run containers, unless the user
# adds a .no_mount file to the directory they mount onto /home/ou/MODULE-PRESENTATION/

# See for example:
# https://github.com/OpenComputingLab/vce-jupyter-stacks/blob/main/tm351-notebook-jh/start_jh_extras

# Create a db hidden storage dir
mkdir -p $LOCAL_HOME/.db

# Migrate postgres db to local userdir
if [[ ! -f "$LOCAL_HOME/.local_postgres" && ! -f "$LOCAL_HOME/.no_mount" ]] ; then
    echo "Copying over postgres database files to $LOCAL_HOME/.db/"

    service postgresql stop

    # We need to give the postgres user sight into the users...
    usermod -aG users postgres

    # Recursive copy, preserving permissions
    cp -Rp /var/lib/postgresql /home/ou/TM351-23J/.db/

    # Manual settings
    #chown -R postgres:postgres $LOCAL_HOME/.db/postgresql
    #chmod -R 700 $LOCAL_HOME/.db/postgresql/

    sed -e "s@[#]\?data_directory = .*@data_directory = '/home/ou/TM351-23J/.db/postgresql/14/main'@g" -i '/etc/postgresql/14/main/postgresql.conf'
 
    touch $LOCAL_HOME/.local_postgres
    chown ou:users $LOCAL_HOME/.local_postgres

    service postgresql restart
fi

#if [ ! -d "$LOCALMONGO" ]; then
if [[ ! -f "$LOCAL_HOME/.local_mongo"  && ! -f "$LOCAL_HOME/.no_mount" ]]; then
    echo "Copying over mongo database files to $LOCAL_HOME/.db/"

    LOCALMONGO="$LOCAL_HOME/.db/mongo/"

    # mongo data directory migration
    if [ ! -f "/var/run/mongodb.pid" ]; then
        service mongod stop
    fi

    mkdir -p $LOCALMONGO
    # Recursive copy, preserving permissions
    cp -Rp /var/db/data/mongo $LOCAL_HOME/.db

    sed -e "s@[#]\?dbPath: .*@dbPath: /home/ou/TM351-23J/.db/mongo@g" -i '/etc/mongod.conf'

    # Check permissions
    #chmod -R u+rw $LOCALMONGO

    touch $LOCAL_HOME/.local_mongo
    chown ou:users $LOCAL_HOME/.local_mongo
    
    service mongod restart
fi

The script is run using sudo, with permissions set as follows in the image build script:

echo "ou ALL=(ALL:ALL) NOPASSWD: /etc/ou_local_db_path/local_db_path.sh" >> /etc/sudoers

An empty .local_postgres and.local_mongo file are used to flag whether or not to copy the files over for each database; a separate .no_mount file can also be used to disable moving the databases. The .no_mount file is created as part of the image build:

touch /home/ou/TM351-23J/.no_mount
chown ou:users /home/ou/TM351-23J/.no_mount

If persistent volume is mounted in, the .no_mount file will be clobbered (unless it is also in the directory that is mounted in); if no volume is mounted in, the data directory is not moved from its default location.

The approach used above is wasteful of space — the original data directories as shipped are copied not moved, but this means we can recover the original seeded database if required.

Deconstructing the TM351 Virtual Computing Environment via VS Code

For 2020J, which is to say, the 2020 October presentation, of our TM351 Data Management and Analysis course, we’ve deprecated the original VirtualBox packaged virtual machine and moved to a monolithic Docker container that packages all the required software applications and services (a Jupyer notebook server, postgres and mongoDB database servers, and OpenRefine).

As with the VM, the container is headless and exposes applications over http via browser based user interfaces. We also rebranded away from “TM351 VM” to “TM351 VCE”, where VCE stands for Virtual Computing Environment.

Once Docker is installed, the environment is installed and launched purely from the command line using a docker run command. Students early in to the forums have suggested moving to docker compose, which simplifies the command line command significantly, but also at the cost of having to supply a docker-compose.yaml . With OU workflows, it can take weeks, if not months, to get files onto the VLE for the first time, and days to weeks to post updates (along with a host of news announcements and internal strife about the possibility of tutors/ALs and students having different versions of the file). As we need to support cross-platfrom operation, and as the startup command specifies file paths for volume mounts, we’d need different docker-compose files (I think?) because file paths on Mac/Linux hosts, versus Windows hosts, use a different file path syntax (forward vs back slashes as path delimiters. [If anyone can tell me how to write a docker-compose.yaml files with arbitrary paths on the volume mounts, please let me know via the comments…]

Something else that has cropped up early in the forums is mention of VS Code, which presents a way to personalise the way in which the course materials are used.

By default, the course materials we provide for practical activities are all based on Jupyter notebooks, delivered via the Jupyter notebook server in the VCE (or via an OU hosted notebook server we are also exploring this year). The activities are essentially inlined using notebook code cells within a notebook that presents a linear teaching text narrative.

Students access the notebooks via their web browser, wherever the notebook server is situated. For students running the Docker VCE, notebook files (and OpenRefine project files) exist in a directory on the student’s own computer that is then mounted into the container; make changes to the notebooks in the container and those changes are saved in the notebooks mounted from host. Delete the container, and the notebooks are still on your desktop. For students using the online hosted notebook server, there is no way of synchronising files back to the student desktop, as far as I am aware; there was an opportunity to explore how we might allow students to use something like private Github repositories to persist their files in a space they control, but to my knowledge that has not been explored (a missed opportunity, to my mind…).

Using the VS Code Python extension, students installing VS Code on their own computer can connect to the Jupyter server running in the containerised VCE and (I don’t know if the permissions allow this on the hosted server).

The following tm351vce.code-workspace file describes the required settings:

{
"folders": [
{
"path": "."
}
],
"settings": {
"python.dataScience.jupyterServerURI": "http://localhost:35180/?token=letmein"
}
}

The VSCode Python extension renders notebooks, so students can open local copies of files from their own desktop and execute code cells against the containerised kernel. If permissions on the hosted Jupyter service allow remote/external connections, this would provide a workaround for synching notebooks files: students would work with notebook files saved on their own computer but executed against the hosted server kernel.

Queries can be run against the database servers via the code cells in the normal way (we use some magic to support this for the postgres database).

If we make some minor tweaks to the config files for the PostgreSQL and MongoDB database servers, we can use the VS Code PostgreSQL extension and MongoDB extension to run queries from VS Code directly against the databases.

For example, the postgres database:

image

and the mongo database:

image

Note that this is now outside the narrative context of the notebooks, although it strikes me that we could generate .sql and .json text files from notebooks that show code literally and comment out the narrative text (the markdown text in the notebooks).

However, we wouldn’t be able to work directly with the data returned from the database via Python/pandas dataframes, as we do in the notebook case. (Note also that in the notebooks we use a Python API for querying the mongo database, rather than directly issuing Javascript based queries.)

At this point you might ask why we would want to deconstruct / decompose the original structured notebook+notebook UI environment and allow students to use VS Code to access the computational environment, not least when we are in the process of updating the notebooks and the notebook environment to use extensions that add additional style and features to the user environment. Several reasons come to my mind that are motivated by finding ways in which we can essentially lose control, as educators, of the user interface whilst still being reasonably confident that the computational environment will continue to perform as we intend (this stance will probably make many of my colleagues shudder; I call it supporting personalisation…):

  • we want students to take ownership of their computational environment; this includes being able to access it from their own clients that may be better suited to their needs, eg in terms of familiarity, accessibility, productivity, etc;
  • a lot of our students are already working in software development and already have toolchains they are working with. Whilst we see benefits of using the notebook UI from a teaching and learning perspective, the fact remains that students can also complete the activities in other user environments. We should not hinder them from using their own environments — the code should still continue to run in the same way — as long as we explain how the experience may not be the same as the one we are providing, and also noting that some of the graphics / extensions we use in the notebooks may not work in the same way, or may not even work at all, in the VS Code environment.

If students encounter issues when using their own environment, rather than the one we provide, we can’t offer support. If the personalised learning environment is not as supportive for teaching and learning as the environment we provide, it is the student’s choice to use it. As with the Jupyter environment, the VS Code environment sits at the centre of a wide ecosystem of third party extesions. If we can make our materials available in that environment, particulalry for students already familiar with that environment, they may be able to help us by identifying and demonstrating new ways, perhaps even more effective ways, of using the VS Code tooling to support their learning than the enviorment we provide. (One example might be the better support VS Code has for code linting and debugging, which are things we don’t teach, and that our chosen environment perhaps even prevents students who know how to use such tools from making use of them. Of course, you could argue we are doing students a service by grounding them back in the basics where they have to do their own linting and print() statement debugging… Another might be the Live Share/collaboration service that lets two or more users work collaboratively in the same notebook, which might be useful for personal tutorial sessions etc.)

From my perspective, I believe that, over time, we should try to create materials that continue to work effectively to support both teaching and learning in environments that students may already be working in, and not just the user interface environments we provide, not least becuase we potentially increase the number of ways in which students can see how they might make use of those tools / environments.

PS I do note that there may be licensing related issues with VS Code and the VS Code extensions store, which are not as open as they could be; VSCodium perhaps provides a way around that.

Dockerising / Binderising the TM351 Virtual Machine

Just before the Chirstmas break, I had a go recasting the TM351 VM as a Docker container built from a Github repository using MyBinder (which is to say: I had a go at binderising the VM…). Long time readers will know that this virtual machine has been used to deliver a computing environment to students on the OU TM351 Data managament and Analysis course since 2016. The VM itself is built using Virtualbox provisioned using vagrant and then distributed originally via a mailed out USB stick or alternatively (which is to say, unofficially; though my preferrred route) as a download from VagrantCloud.

The original motivation for using Vagrant was a hope that we’d be able to use a range of provisioners to construct VM images for a range of virtualisation platforms, but that’s never happened. We still ship a Virtualbox image that causes problems to a small number of Windows users each year, rather than a native HyperV image, because: a) I refuse to buy a Windows machine so I can build the HyperV image myself; b) no-one else sees benefit from offering multiple images (perhaps because they don’t provide the tech support…).

For all our supposed industrial scale at delivering technology backed “solutions”, the VM is built, maintained and supported on a cottage industry basis from within the course team.

For a scaleable solution that would work:

a) within a module presentation;
b) across module presentations;
c) across modules

I think we should be looking at some sort of multi-user hosted service, with personal accounts and persistent user directories. There are various ways I can imagine delivering this, each that creates its own issues as well solving particular problems.

As a quick example, here are two possible extremes:

1) one JupyterHub server to rule them all: every presentation, every module, one server. JupyterHub can be configured to use the DockerSpawner to present different kernel container options to the user, (although I’m not sure if this can be personalised on a per user basis? If not, that feature would make for a useful contribution back…), so a student could be presented with a list of containers for each of their modules.

2) one JupyterHub server per module per presentation: this requires more admin and means servers everywhere, but it separates concerns…

The experimental work on a “persistent Binderhub deployment” also looks interesting, offering the possibility of launching arbitrary environments (as per Binderhub) against personally mounted file area (as per JupyterHub).

Providing a “takeaway” service is also one of my red lines: a student should be free to take away any computing environment we provide them with. One in-testing hosted version of the TM351 VM comes, I believe, with centralised Postgres and MongoDB servers that students have accounts on and must log in to. Providing a mutli-user service, rather than a self-contained personal server, raises certain issues regarding support, but also denies the student the ability to take away the database service and use it for their own academic, personal or even work purposes. A fundamentally wrong approach, in my opinion. It’s just not open.

So… binderising the VM…

When Docker containers first made their appearance, best practice seemed to be to have one service per container, and then wire containers together using docker-compose to provide a more elaborate environment. I have experimented in the past with decoupling the TM351 services into separate containers and then launching them using docker-compose, but it;s never really gone anywhere…

In the communities of practice that I come across, more emphasis now seems to be on putting everything into a single container. Binderhub is also limited to launching a single container (I don’t think there is a Jupyter docker-compose provisioner yet?) so that pretty much seals it… All in one…

A proof-of-concept Binderised version of the TM351 VM can be found here: innovationOUtside/tm351vm-binder.

It currently includes:

  • an OU branded Jupyter notebook server running jupyter-server-proxy;
  • the TM351 Python environment;
  • an OpenRefine server proxied using jupyter-server-proxy;
  • a Postgres server seeded (I think? Did I do that yet?!) with the TM351 test db (if I haven’t set it up as per the VM, the code is there that shows how to do it…);
  • a MongoDB server serving the small accidents dataset that appears in the TM351 VM.

What is not included:

  • the sharded Mongo DB activity; (the activity it relates to as presented at the moment is largely pointless, IMHO; we could deminstrate the sharding behaviour with small datasets, and if we did want to provided queries over the large dataset, that might make sense as something we host centrally and et students log in to query. Which would also give us another teachng point.)

The Binder configuration is provided in the binder/ directory. An Anaconda binder/environment.yml file is used to install packages that are complicated to build or install otherwise, such as Postgres.

The binder/postBuild file is run as a shell script responsible for:

  • configuring the Postgres server and seeding its test database;
  • installing and seeding the MongoDB database;
  • installing OpenRefine;
  • installing Python packages from binder/requirements.txt (the requirements.txt is not otherwise automatically handled by Binderhub — it is trumped by the environment.yml file);
  • enabling required Jupyter extensions.

If any files handled via postBuild need to be persisted, they can be written into $CONDA_DIR.

(As a reference, I have also created some simple standalone template repos showing how to configure Postgres and MongoDB in Binderhub/repo2docker environments. There’s also a neo4j demo template too.)

The binder/start file is responsible for:

  • defining environment variables and paths required at runtime;
  • starting the PostgreSQL and MongoDB database services.

(OpenRefine is started by the user from the notebook server homepage or JupyterLab. There’s a standalone OpenRefine demo repo too…)

Launching the repo using MyBinder will build the TM351 environment (if a Binder image does not already exist) and start the required services. The repo can also be used to build an environment locally using repo2docker.

As well as building a docker image within the Binderhub context, the repo is also automated with a Github Action that is used to build release commits using repo2docker and then push the resulting container to Docker Hub. The action can be found in the .github/workflows directory. The container can be found as ousefuldemos/tm351-binderised:latest. When running a container derived from this image, the Jupyter notebook server runs on the default port 8888 inside the container, and the OpenRefine application proxied through it; the database services should autostart. The notebook server is started with a token required, so you need to spot the token from the start up logs of the container – which means you shouldn’t run it with the -d flag. A variant of the following command should work (I’m not sure how you reliably specify the correct $PWD (present working directory) mount directory from a Windows command prompt):

docker run --name tm351test --rm -p 8895:8888 -v $PWD/notebooks:/notebooks -v $PWD/openrefine_projects:/openrefine_projects ousefuldemos/tm351-binderised:latest

Probably easier is to use the Kitematic inspired containds “personal Binderhub” app which can capture and handle the token auomatically and let you click straight through into the running notebook server. Either use containds to build the image locally by providing the repo URL, or select a new image and search for tm351: the ousefuldemos/tm351-binderised image is the one you want. When prompted, select the “standard” launch route, NOT the ‘Try to start Jupyter notebook’ route.

Although I’ve yet to try it (I ran out of time before the break), I’m hopeful that the prebuilt container should work okay with JupyterHub. If it does, this means the innovationOUtside/tm351vm-binder repo can serve as a template for building images that can be used to deploy authenticated OU computing environments via an OU authenticated and OU hosted JupyterHub server (one can but remain hopeful!).

If you try out the environment, either using MyBinder, via repo2docker, or from the pre-built Docker image, please let me know either here, via the repo issues, or howsoever: a) whether it worked; b) whether it didn’t; c) whether there were any (other) issues. Any and all feedback would be much appreciated…

Nudging Student Coders into Conforming with the PEP8 Python Style Guide Using Jupyter Notebooks, flake8 and pycodestyle_magic Linters

My code is often a mishmash of styles, although I do try to be internally consistent in style in any given notebook or module. And whilst we had the intention that all the code in our TM351 notebooks would be strongly PEP8 compliant, much of it probably isn’t.

So as we start another presentation of TM351, I think that this year I am going to run the risk of adding even more stuff to the student workload in the form of optional, yet regularly posted, notebook productivity tips.

Whilst these will not directly address any of the module learning outcomes that I can recall offhand, they may help students develop their own code in a more efficient way than they might otherwise, and also present it rather more tidily in assessment material. (The latter can often have the effect of improving a marker’s mood, which in turn may influence the mark awarded…)

So what sorts of thing do I intend to cover?

  • simple debugging strategies for one thing: we don’t really teach, or debug, any formal approaches to debugging, although we do encourage “an interactive line at a time” approach to trying out, and developing, data cleaning, shaping, analysis and visualisation code sequences in the notebooks; however, the Python interactive debugger is available in the notebooks too and I think that providing some simple, and relevant, examples of how to use it once student have developed some familiarity with both the notebooks and the style of coding we are using in the course, may be helpful to some of them;

  • simple notebook extensions for monitoring cell execution state on the one hand and profiling code execution on the other, is another area that doesn’t directly address the topic matter directly (coding for data management and analysis), but will provide students with tools that allow them to explore and interrogate their own code in a rather more structured way than they might otherwise;

  • code styling and linting is the first thing I’m going to focus on, however; the intention here is to introduce students to some simple tools and strategies for writing code that conforms to PEP8 style guidelines.

The approach I’m probably going to take is to publish “nudging” posts into the forums once every week or two. Here’s an example of the sort of thing I posted today to introduce the notion of linting and code styling:

Writing Nicely Styled Python Code

In professional code development projects, code it typically written according to a style guide that describes a convention for how to present and layout the code.

In Python projects, the PEP8 style guide defines one such widely followed convention (the code we have provided in the notebooks tends towards PEP8 compliance… Each time we revisit a notebook, we try to tighten it up a bit further!).

Several tools are available for use with Jupyter notebooks that support the creation of PEP8 conformant code. The attached notebook provides instruction on how to install and enable one such tool, pycodestyle_magic, which can provide warnings about when your code style diverges from PEP8 conventions.

The notebook describes how to configure your VM to automatically load pycodestyle_magic and, if required, automatically enable it, in each of your notebooks.

The output of the magic takes the form of a report at the bottom of each code cell identifying any stylistic errors in a particular code cell each time that code cell is run:

image

alt-text: Example of pink warning message area listing PEP8 style guide contraventions generated via pycodestyle_magic

Each line of the report takes the form:

LINE_NUMBER:CHARACTER_NUMBER: RULE_IDENTIFIER Explanatory text

You can toggle line numbers on and off in a code cell by clicking in the code cell and using the keyboard shortcut: ESC-l

You are not required to install the extension, or even write PEP8 compliant code. However, you may find that it does help make your code readable, and that with practice you soon start to write code that does not raise many PEP8 errors.

(Note that some error reports could do with disabling, such as D100; the extension treats each code cell as a Python module, which is conventionally started with a triple double quoted (sic) comment string (eg """My Module."""). The magic does not currently support ignoring specific errors.)

The notebook itself can be found here: Notebook Code Linting.ipynb.

Quick Way in to Hacking Legacy OU Course Materials Using Markdown

By some arcane process, OU course materials authored typically in MS Word are converted to an XML format (OU-XML) and then rendered variously to HTML for the Moodle website, ebook formats, and perhaps PDF (we don’t want to make it too easy for students to print of the materials…).

An internal project that ran for a couple of years (maybe a bit more) looking at more direct authoring workflows was shelved earlier this year. (I was banned from blogging about it whilst it was under development, so I’m afraid I don’t have screen shots to show what it looked like from the time I was given preview access.) As far as I know, the authoring tool was completely distinct from the one developed by the OU’s bastard offspring that is FutureLearn. Nowt like sharing.

One of the things I’m slated to do over the next few months is update, or possibly rewrite, a unit in a first year equivalent module.

My preferred way of authoring for some time has been to keep it simple and just use markdown.

So that’s what I’m probably going to do.

If there’s any griping or sniping that it doesn’t fit the OU workflow, I’ll just run it through pandoc to generate an MS Word docx version and hand that over.

(I’ve been saying *for years* we should have pandoc read/write filters for OU-XML (the most recent notes are here). It would have been a damn site cheaper than the aborted authoring tool project and would have allowed authors to explain a whole range of tools for creating their warez, with pandoc handling the conversion to OU-XML. And yes, I f**king know that some hand cleaning of the OU-XML would almost certainly have been required but we’d have got a far better feeling for what sorts of document structures folk produce if they were allowed to use the tools that suit them. And authors’ shonky mark-up (including my own) *always* needs some fettling anyway: we already know that…)

So… markdown…

If I’m going to revise the current materials, I need to get them out of the current format and into markdown. I’ve previously started looking at an XSLT to convert OU-XML to markdown, eg as described in Fragment – OpenLearn Jupyter Books Remix; a copy of the current-ish XSLT, and some code fragments to grab and convret an example OU-XML document, can be found here.

But today, I thought of an even scruffier and quicker way…

Within the VLE, a single OU-XML source document is rendered across multiple HTML pages, along  with a navigation index:

A single HTML page view (for easier printing) is also available… Hmmm…there are plenty of HTML2markdown converters out there, aren’t there?

#!pip3 install markdownify
from bs4 import BeautifulSoup
from markdownify import markdownify as md

with open('Robotics study week 1 – Introduction_ View as single page.html', 'r') as f:
    # Let's just grab the HTML body...
    tree = BeautifulSoup(f.read(), 'lxml')
    body = tree.body
    txt = md(str(body))
    
with open('week1-mardownify.md','w') as f:
    # There'll still be script tag cruft, videos won't be embedded / linked etc
    # but it's enough to get started with and the diffs should be easy to see...
    f.write(txt)

The output is a bit flakey in parts, but most of the stuff I need is there.  Certainly, there’s more than enough of it in useable form for me to start using as an outline. Indeed, much of the work will be ripping out and replacing the huge chunks of content that are now rather dated.

I can also edit the markdown in a notebook environment using Jupytext, using metadata cells to highlight certain blocks of content with additional structural or semantic metadata, saving the metadata into the markdown document from where it could be processed (I’m not sure how it would turn up if the enhanced markup were converted to docx using pandoc, for example?).

From what I saw of the aborted OpenCreate editor, it used a block/cell style metaphor for creating separate content elements within a page, so it’d also be interesting to compare the jupytext/metadata enhanced markdown, or even the notebook ipynb output format, with the OpenCreate document format / representation to see whether there are similarities in the block level semantic / structural markup.

First Play With nbgallery

Having hacked together a bulk uploader for nbgallery and uploaded the TM351 notebooks to a test environment, I’m now in a position to start having a play with it.

All public notebooks are searchable, so how does the search fare?

The search box top right gets a little bit lost in the search results listing. It could be handy to at least print out the search string (“Searching for: …”) at the top of the results list, if not making the search box larger and in a more central location. The search results themselves take the form of the name / description/tag of each hit (i.e. the notebook metadata) along with a fragment showing how the search terms appeared in context within the notebook.

Some of my earlier experiments on notebook search here and here also show context.

A range of options are provided for ordering the results. Trending looks like it could be interesting (this is based on recent views, presumably), for example where students are searching notebooks relevant to the current week’s study.

That said, we can also display notebooks by tag, so it’s easy enough to display notebooks associated with a particular week’s study if we tag notebooks by study week:

(One thing I noticed zooming out on the page to grab the above screenshot is that the font size of the notebook titles doesn’t seem to respond to the zoom level; it would probably be worth checking to see if there are other accessibility issues.)

If we click through on a result, we see a list of related notebooks followed by a preview of the notebook. (nbgallery strips out all cell outputs on upload, so no cell outputs are displayed).

To search through the preview, we can use a normal browser in-page search (ctrl/cmd-F).

A range of options are provided to support community activity around a notebook for logged in users, including the ability to “star” a notebook, provide feedback or add a comment:

Logged in users can also click on the notebook tags to edit them.

Via the Further options menu, users can view various notebook metrics, email a notebook, or propose a change request:

The metrics available include number of views, runs, stars and the edit history.

If comments have been provided, the number indicator by the comment flag shows how many comments have been received, although this only appears on the notebook page. There doesn’t appear to be an indicator of how many comments are associated with a notebook on the search results page, nor did I spot a general “recent comments” feed anywhere.

When you post a comment, there is no indication that you have done so and the form remains in place. You need to close it manually. (Hitting “Post Comment” again just pops up a “can’t do that” alert on the grounds that you’re trying to post a duplicate comment.)

The comments themselves look as if they are an ordered (rather than threaded) list. It also looks like any signed in used can edit anybody else’s comment?

Users who aren’t signed in can download a notebook, but not star it, comment on it, modify the tags etc.

When I tried to add feedback, I got an error:

I’m not sure if there are settings I need to tweak to address that?

Logged in users can also run a notebook from nbgallery via an associated notebook server. (I’d prefer it if the Run in Jupyter flash wasn’t displayed if there isn’t a linked notebook server available for the logged in user.) For example, running a notebook server on  port 443 on the same host as nbgallery using the nbgallery notebook container:

docker run --rm -p 443:443 -e "NBGALLERY_URL=http://localhost:3000" -e "NBGALLERY_CONFIG_TOKEN=letmein" nbgallery/jupyter-alpine

starts a notebook server with the nbgallery extension pre-installed.

We can view the notebook server homepage on https://localhost:443 and log into it using the token-as-password letmein. Running the container in the way described above also gives permission for the nbgallery server running in on http://localhost:3000 to open notebooks via the notebook server.

Within nbgallery itself, a logged in user can associate one of more Jupyter environments via the user menu:

Each environment is given a name and the URL of the associated notebook server (in this case, https://localhost:443):

When a notebook server is associated with a user, notebooks can be opened from nbgallery within the notebook server.

If we create a new notebook in the linked notebook server, we can upload it to nbgallery, adding a title, description and optional tags as in a manual notebook upload step:

If we modify the notebook that is linked to one in the gallery (that is, that has been uploaded to the gallery or launched from the gallery), we can save a change to the gallery or submit a change request:

When uploading a new version, you can add tags but not additional comments such as a commit message:

Viewing the notebook details in nbgallery, we can see a summary of the change history:

We can also click through to a preview of each version of the notebook:

(The revision number doesn’t appear in the change history though, so it can be hard to reconcile a particular version with it’s appearance in the change history listing.)

A logged in user can make a change request to someone else’s notebooks by uploading a new version of them or by opening the notebook in the linked notebook server and submitting a change request:

When I submitted the change request, I got an error form in response, but it looks like the change request was made, as this listing of Change Requests from the user menu suggests:

An exclamation mark by the user menu also identifies that change requests are pending.

Viewing the change request provides a view over the current version of the notebook and the proposed changes. Notebooks can be viewed alongside each other or the diffs can be viewed:

The thumbs up/down indicators are used to accept or deny a change request, along with a brief comment:

Accepted changed notebooks are used to replace the current version of the notebook, and the change logged in the change history. Denied change requests are recorded as such in the change requests list, with a link to the version of the notebook containing the unsuccessfully proposed changes:

If feedback was provided, a comment icon identifies its presence and pops up the feedback in a tooltip when hovered over.
Health stats for linked and run notebooks are supposed to be available, but I couldn’t get those to work (as far as the health stat reports were concerned, the notebooks were never run no matter how many times I ran them), so maybe I’m missing something there in the setup too? [UPDATE: health settings run with a flag set: notebook instrumentation docs; specifically, -e NBGALLERY_ENABLE_INSTRUMENTATION=1 in the docker command line.]

I’m not sure how well this would work for managing TM351 notebooks compared to out current Github workflow (which I should write up somewhere). The error responses (whether they’re valid or not) for change requests and feedback are confusing, and I’m not sure how the feedback is handled if and when it works. Not being able to easily spot new comments easily (unless I’m missing something) could be a bit of a pain. That said, the proof would be in the testing-through-use, so I’ll maybe give it a week or two’s trial with some of my own notebook workflows.

In terms of use with students, it could be useful to provide a version of nbgallery with notebooks runnable by students without them having to log in to it. It could also be useful if notebooks could be run ‘inline’ from the notebook preview pages, for example using something like ThebeLab or Voila, particularly if a particular Binderhub repo / config could be specified in metadata somewhere.

Editing Text in the Browser

Via the Guardian Developer blog, a post — Leaving Scribe — describing how the Guardian is moving away from its Scribe in-browser text editor to a new one based on ProseMirror, an open-source toolkit “for building rich-text editors on the web” that is also used by the New York Times.

In-browser editors are not something I know much (i.e. anything) about, but the Leaving Scribe post provides a handy review of what’s good to know (like how markup is handled). Go and read it now…

It seems like the Guardian folk have many of the same issues as we do in the OU. For example:

Another area where HTML as a model falls down is editor-only annotations (markup that helps the writer but is detrimental to the reader). Take for example the need to highlight a word in the text that meets some criteria (a suggested tag, or some legal issue around using this word). You may want to show an inline annotation to ask the editor whether they want to add this as a tag.

The problem here is that now we have data that is not part of the document, and yet it is modelled as part of our document. This is technically solvable but again, the DOM API is not well suited for handling this sort of data modelling, especially when the usage of these features becomes more complex. As you start to force more complex features through an HTML data model you have to do more and more work to get around HTML’s limitations around modelling a rich text document and you hit more and more of the browser inconsistencies.

Features of ProseMirror based editors apparently include collaborative editing and an extensible schema. This last one is interesting from an OU perspective, because we have a workflow in which content is published from an internal XML document feedstock.

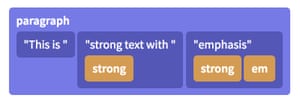
The important difference between Scribe and ProseMirror is that ProseMirror implements its own model layer that has a one-to-one mapping from semantics to the model, and an API that is made with document transformation in mind – not least collaborative editing.

An image representation of ProseMirror's model

In ProseMirror, inline content is flat rather than a tree, which means operations like changing styles on text don’t require any tree manipulation. And while nodes (h1, p, blockquote etc.) are still modelled as a tree but again, this accurately models how users think about things like paragraphs and lists, and it’s almost always how they’re rendered when consuming an article.

I’m not sure if the halted OU Create project was using ProseMirror? (I never really found out any technical details and I was banned from posting screenshots or discussing [di(scu)ssing?!] it in public!;-)

We hope in time to be able to get our editor to a point that it is able to be open-sourced but we’ll only do this if we believe we have the documentation and resource in place for that to be useful to users outside the Guardian.

Ah ha… It’d be nice if an OU solution could work in an open-sourcey way, or perhaps join forces with others to get such code out there…

One of the things I’ve been pondering lately is how to generate OU XML from Jupyter notebooks, as well how to demonstrate rich text authoring in notebooks using things like the jupyter-wysiwyg editor (I wonder how easy it is to modify that extension to work with other rich editors?)

So I wonder a couple of things:

  • how easy would it be to extend ProseMirror to support the OU XML schema?
  • could this customised editor then be used as a rich editor inside a Jupyter notebook markdown cell? (Would it need tweaks to the markdown2html renderer, or an OU-XML2HTML previewer?)

I’m also thinking that OU-XML has a lot of metadata elements which could be embedded as notebook metadata, with just a subset of the OU-XML being supported within the markdown cells. (Markdown cells could also have metadata associated with them.)

I think we could probably get a clunky workflow going quite quickly for authoring OU-XML docs from within Jupyter notebooks if anyone else was interested in exploring it with me…

Using Selenium to Support Teaching and the Production and Maintenance of Teaching Materials?

At the OU, we tell ourselves lots of myths, but don’t necessarily act them out. I believe more than a few of them, not least the one that we’re a content factory. I also believe we used to be really innovative in our production methods, but I think that’s largely fallen by the wayside in recent years.

The following is an example of a few hours play, though each step has probably taken me longer to write up in this post than the documented proof of concept code for each step took to produce.

It’s based on a couple of observations about Selenium that I hadn’t fully grokked until I played with it over the weekend, as described in the previous post (a recipe for automating bulk uploads of Jupyter notebooks to nbgallery), and then a riff or two off the back of them.

First up, I think we can use this to support teaching in a several ways.

One of the strategies we use in the OU for documenting how to use software applications is to use narrated screencasts, which is to say, screen-recordings of how to use an application with a narrated audio track explaining what’s going, and/or overlaid captions.

I wrote my nbgallery script as a way of automating bulk uploads, but its not hard to see how it can also be used to help in the automation of a screencast:

In that case, I did a test run to see where the browser was opened, then used Giphy to record a video of that part of the screen as I replayed the script.

The last time I recorded one of these was a couple of years ago and as I recall was a bit of a faff as I read from a script to dub the audio (I’m not a natural when it comes to the studio; I’m still not that comfortable, but still find it easier, recording an ad libbed take, although this is may become a bit fiddly when trying at the same time to control an application with a reasonable cadence).

What might have been easier would have been to script the sequence of button presses and mouse actions (though mousing actions would be lost?)

That said, it is possible to script in some highlighting too…

For example:

import time

#https://gist.github.com/dariodiaz/3104601
def highlight(element, sleep=1.0):
    """Highlights (blinks) a Selenium Webdriver element"""
    driver = element._parent
    def apply_style(s):
        driver.execute_script("arguments[0].setAttribute('style', arguments[1]);",
                              element, s)
    original_style = element.get_attribute('style')
    apply_style("background: yellow; border: 2px solid red;")
    time.sleep(sleep)
    apply_style(original_style)

gives something like this:

A couple of different workflows are possible here.

Firstly, we could bake timings in and record a completely automated screen-capture using time,wait() commands to hold each step as long as we need (or long enough so an editor can easily pause the video at a particular point for as many frames as are required).

Alternatively, we could use the notebook to allow us to step through the automation of particular actions.

What’s more, the notebook could include a script. Here’s an example in a step-through style:

One of the big issues with creating assets such as these is knowing the storyboard — what you expect to see at each step. This is particular true if a software application or webpage is updated, and an automation script breaks.

At a technical level, knowing what the original paged looked like as HTML can help, but the best crib is often a view of the original rendered display.

Which makes me think: it’s trivial to grab a screenshot of each step and insert those back into the notebook?

Here’s a code fragment for that:

import tempfile
from IPython.display import Image

#Create a temporary file for now
imgfile = tempfile.mktemp(suffix='.png')

#Get a browser element - this would be any old step
driver.find_element_by_id("uploadModalButton").click()

#Grab a screenshot fo the browser
driver.save_screenshot(imgfile)

#Display the screenshot in the notebook
Image(imgfile)

Not only can this help us document script at a step level, but it also sets up an opportunity to create a text document (rather than a video screencast) that describes what steps to do when.

Can we also record a video of the automation? Selenium appears not to offer that out of the can, but maybe ffmpeg can help (ffmpeg docs)? Alternatively this Selenium docker image looks to support video capture, though I don’t see offhand to drive it from Python?

I also wonder: do the folk who do testing use this sort of automation, and if so, why don’t they share the knowledge and scripts back with us as a way of helping automate production as well as test? After all, that’s where factories are useful: mechanisation / automation helps with the scaling.

Once we start thinking about creating sorts of media asset, it’s natural to ask: could we also create a soundtrack?

I don’t see why not…

For example, pyttx3 is a cross-platform text-to-speech application, albeit with not necessarily the best voice:

#!pip3 install pyobjc pyttsx3

import pyttsx3
engine = pyttsx3.init()

def sayItToMe(txt):
    ''' Simple text to speech. '''
    engine.say(txt)
    engine.runAndWait()

We can explicitly create text strings, but I don’t see why we should also find a way of grabbing relevant text from markdown cells?

TXT = '''
The first thing we need to do is log in.
'''
sayItToMe(TXT)

TXT = '''
Select the person icon at the top right of the screen.
'''
sayItToMe(TXT)

element = driver.find_element_by_id("gearDropdown")
highlight(element)
element.click()

Okay, so that’s one way in which we may be able to make use of Selenium, as a way of creating reproducible scripts for creating documentation in a variety of media of how to use a particular web application or website.

How about the second?

I think that one of the claims made for using Scratch in our introductory computing module is that you can get it to control animated things, which can help novices see the actions of particular steps in an animated way originally designed to appeal to primary school children. (And yes, I am prepared to argue an androgogy vs. pedagogy thing, as well as a curriculum thing, about why I think we should have used BlockPy.)

If you want shiny, and animated, and perhaps a little a bit frightening, perhaps (surprisingly) useful, and contextualised by all sorts of other basic computing stuff, like how browsers work, and what HTML and the DOM are (so you can probably make synoptic claims too…), then automatically launching a browser from a script and getting it to click things and take pictures might be seen as a really cool, or fun, thing to do — did you know you can…? etc. — and along the way provide a foil for learning a bit about scripting too.

Whatever…

PS longtime readers will note the themes of this post fit in with a couple of oft-repeated ideas contained elsewhere in this blog. For example, the notion I’m trying to work up of “reproducible educational materials” (which also doubles as the automation of rich media assets, and which is something I think is useful from production, testing and maintenance perspectives in a content factory (though no-one else seems to agree:-(,l and the use of notebooks for everything (which again, most people I know think is just me going off on one again…:-(.

Fragment – Running Multiple Services, such as Jupyter Notebooks and a Postgres Database, in a Single Docker Container

Over the last couple of days, I’ve been fettling the build scripts for the TM351 VM, which typically uses vagrant to build a VirtualBox VM from a set of shell scripts, so they can be used to build a single Docker container that runs all the TM351 services, specifically Jupyter notebooks, OpenRefine, PostgreSQL and MongoDB.

Docker containers are typically constructed to a run a single service, with compositions of containers wired together using Docker Compose to create applications that deliver, or rely on, more than one running service. For example, in a previous post (Setting up a Containerised Desktop API server (MySQL + Apache / PHP 5) for the ergast Motor Racing Data API) I showed how to set up a couple of containers to work together, one running a MySQL database server, the other an http service that provided an API to the database.

So how to run multiple services in the same container? Docs on the Docker website suggest using supervisord to run multiple services in a single container, so here’s a fragment on how I’ve done that from my TM351 build.

To begin with, I’ve built the container up as a tiered set of containers, in a similar way to the way the stack of opinionated Jupyter notebook Docker containers are constructed:

#Define a stub to identify the images in this image stack
IMAGESTUB=psychemedia/tm361testm

# minimal
## Define a minimal container, eg a basic Linux container
## using whatever flavour of Linux we prefer
docker build --rm -t ${IMAGESTUB}-minimal-test ./minimal

# base
## The base container installs core packages
## The intention is to define a common build environment
## populated with packages likely to be common to many courses
docker build --rm --build-arg BASE=${IMAGESTUB}-minimal-test -t ${IMAGESTUB}-base-test ./base

#...

One of the things I’ve done to try to generalise the build steps is allow the name a base container to be used to bootstrap a new one by passing the name of the base image in via an optional variable (in the above case, --build-arg BASE=${IMAGESTUB}-minimal-test). Each Dockerfile in a build step directory uses the following construction to work out which image to use as the FROM basis:

#Set ARG values using --build-arg =
#Each ARG value can also have a default value
ARG BASE=psychemedia/ou-tm351-base-test
FROM ${BASE}

Using the same approach, I have used separate build tiers for the following components:

  • jupyter base: minimal Jupyter notebook install;
  • jupyter custom: add some customisation onto a pre-existing Jupyter notebook install;
  • openrefine: add the OpenRefine application; (note, we could just use BASE=ubuntu to create this a simple, standalone OpenRefine container);
  • postgres: create a seeded PostgreSQL database; note, this could be split into two: a base postgres tier and then a customisation that adds users, creates and seed databases etc;
  • mongodb: add in a seeded mongo database; again, the seeding could be added as an extra tier on a minimal database tier;
  • topup: a tier to add in anything I’ve missed without having to go back to rebuild from an earlier step…

The intention behind splitting out these tiers is that we might want to have a battle hardened OU postgres tier, for example, that could be shared between different courses. Alternatively, we might want to have tiers offering customisations for specific presentations of a course, whilst reusing several other fixed tiers intended to last out the life of the course.

By the by, it can be quite handy to poke inside an image once you’ve created it to check that everything is in the right place:

#Explore inside animage by entering it with a shell command
docker run -it --entrypoint=/bin/bash psychemedia/ou-tm351-jupyter-base-test -i

Once the services are in place, I add a final layer to the container that ensures supervisord is available and set up with an appropriate supervisord.conf configuration file:

##Dockerfile
#Final tier Dockerfile
ARG BASE=psychemedia/testpieces
FROM ${BASE}

USER root
RUN apt-get update && apt-get install -y supervisor

RUN mkdir -p /openrefine_projects  && chown oustudent:100 /openrefine_projects
VOLUME /openrefine_projects

RUN mkdir -p /notebooks  && chown oustudent:100 /notebooks
VOLUME /notebooks

RUN mkdir -p /var/log/supervisor
COPY monolithic_container_supervisord.conf /etc/supervisor/conf.d/supervisord.conf

EXPOSE 3334
EXPOSE 8888

CMD ["/usr/bin/supervisord"]

The supervisord.conf file is defined as follows:

##supervisord.conf
##We can check running processes under supervisord with: supervisorctl

[supervisord]
nodaemon=true
logfile=/dev/stdout
loglevel=trace
logfile_maxbytes=0
#The HOME envt needs setting to the correct USER
#otherwise jupyter throws: [Errno 13] Permission denied: '/root/.local'
#https://github.com/jupyter/notebook/issues/1719
environment=HOME=/home/oustudent

[program:jupyternotebook]
#Note the auth is a bit ropey on this atm!
command=/usr/local/bin/jupyter notebook --port=8888 --ip=0.0.0.0 --y --log-level=WARN --no-browser --allow-root --NotebookApp.password= --NotebookApp.token=
#The directory we want to start in
#(replaces jupyter notebook parameter: --notebook-dir=/notebooks)
directory=/notebooks
autostart=true
autorestart=true
startsecs=5
user=oustudent
stdout_logfile=NONE
stderr_logfile=NONE

[program:postgresql]
command=/usr/lib/postgresql/9.5/bin/postgres -D /var/lib/postgresql/9.5/main -c config_file=/etc/postgresql/9.5/main/postgresql.conf
user=postgres
autostart=true
autorestart=true
startsecs=5

[program:mongodb]
command=/usr/bin/mongod --dbpath=/var/lib/mongodb --port=27351
user=mongodb
autostart=true
autorestart=true
startsecs=5

[program:openrefine]
command=/opt/openrefine-3.0-beta/refine -p 3334 -i 0.0.0.0 -d /vagrant/openrefine_projects
user=oustudent
autostart=true
autorestart=true
startsecs=5
stdout_logfile=NONE
stderr_logfile=NONE

One thing I need to do better is to find a way to stage the construction of the supervisord.conf file, bearing in mind that multiple tiers may relate to the same servicel for example, I have a jupyter-base tier to create a minimal Jupyter notebook server and then a jupyter-base-custom tier that adds in specific customisations, such as branding and course related notebook extensions.

When the final container is built, the supervisord command is run and the multiple services started.

One other thing to note: we’re hoping to run TM351 environments on an internal OpenStack cluster. The current cluster only allows students to expose a single port, and port 80 at that, from the VM (IP addresses are in scant supply, and network security lockdowns are in place all over the place). The current VM exposes at least two http services: Jupyter notebooks and OpenRefine, so we need a proxy in place if we are to expose them both via a single port. Helpfully, the nbserverproxy Jupyter extension (as described in Exposing Multiple Services Via a Single http Port Using Jupyter nbserverproxy), allows us to do just that. One thing to note, though – I had to enable it via the same user that launches the notebook server in the suoervisord.conf settings:

##Dockerfile fragment

RUN $PIP install nbserverproxy

USER oustudent
RUN jupyter serverextension enable --py nbserverproxy
USER root

To run the VM, I can call something like:

docker run -p 8899:8888 -d psychemedia/tm351dockermonotest

and then to access the additional services, I can browse to e.g. localhost:8899/proxy/3334/ to see the OpenRefine application.

PS in case you’re wondering why I syndicated this through RBloggers too, the same recipe will work if you’re using Jupyter notebooks with an R kernel, rather than the default IPython one.

Interactive Authoring Environments for Reproducible Media: Stencila

One of the problems associated with keeping up with tech is that a lot of things that “make sense” are not the result of the introduction or availability of a new tool or application in and of itself, but in the way that it might make a new combination of tools possible that support a complete end to end workflow or that can be used to reengineer (a large part of) an existing workflow.

In the OU, it’s probably fair to say that the document workflow associated with creating course materials has its issues. I’m still keen to explore how a Jupyter notebook or Rmd workflow would work, particularly if the authored documents included recipes for embedded media objects such as diagrams, items retrieved from a third party API, or rendered from a source representation or recipe.

One “obvious” problem is that the Jupyter notebook or RStudio Rmd editor is “too hard” to work with (that is, it’s not Word).

A few days ago I saw a tweet mentioning the use of Stencila with Binderhub. Stencila? Apparently, *”[a]n open source office suite for reproducible research”. From the blurb:

[T]oday’s tools for reproducible research can be intimidating – especially if you’re not a coder. Stencila make reproducible research more accessible with the intuitive word processor and spreadsheet interfaces that you and your colleagues are already used to.

That sounds appropriate… It’s available as a desktop app, but courtesy of minrk/jupyter-dar (I think?), it runs on binderhub and can be accessed via a browser too:


You can try it here.

As with Jupyter notebooks, you can edit and run code cells, as well as authoring text. But the UI is smoother than in Jupyter notebooks.

(This is one of the things I don’t understand about colleagues’ attitude towards emerging tech projects: they look at today’s UX and think that’s it, because that’s how it is inside an organisation – you take what you’re given and it stays the same for decades. In a living project, stuff tends to get better if it’s being used and there are issues with it…)

The Jupyter-Dar strapline pitches “Jupyter + DAR compatibility exploration for running Stencila on binder”. Hmm. DAR? That’s also new to me:

Dar stands for (Reproducible) Document Archive and specifies a virtual file format that holds multiple digital documents, complete with images and other assets. A Dar consists of a manifest file (manifest.xml) that describes the contents.

Dar is being designed for storing reproducible research publications, but the underlying concepts are suitable for any kind of digital publications that can be bundled together with their assets.

Repo: [substance/dar](https://github.com/substance/dar)

Sounds interesting. And which reminds me: how’s OpenCreate coming along, I wonder? (My permissions appear to have been revoked again; or the URL has changed.)

PS seems like there’s more activity in the “pure web” notebook application world. Hot on the heels of Mike Bostock’s Observable notebooks (rationale) comes iodide, “[a] frictionless portable notebook-style interface for literate scientific computing in the browser” (examples).

I don’t know if these things just require you to use Javascript, or whether they can also embed things like Brython.

I’m not sure I fully get the js/browser notebooks yet? I like the richer extensibility of things like Jupyter in terms of arbitrary language/kernel availability, though I suppose the web notebooks might be able to hook into other kernels using similar mechanics to those used by things like Thebelab?

I guess one advantage is that you can do stuff on a Chromebook, and without a network connection if you cache all the required JS packages locally? Although with new ChromeOS offering support for Linux – and hence, Docker containers – natively, Chromebooks could get a whole lot more exciting over the next few months. From what I can tell, corsvm looks like a ChromeOS native equivalent to something like Virtualbox (with an equivalent of Guest Additions?). It’ll be interesting how well things like audio works? Reports suggest that graphical UIs will work, presumably using some sort of native X11 support rather than noVNC, so now could be a good time to start looking out for souped up Pixelbook…

PS March 2019 – Stencila desktop appears to have stalled for some time. As it’s built on the Texture wordprocessor / editor, it may end up as a plugin for that…

PPS June 2021 – have things rebooted again for Stencila? https://elifesciences.org/labs/a04d2b80/announcing-the-next-phase-of-executable-research-articles